
“Holiday Magic on a Plate: Traditional Christmas Dishes Everyone Loves”
- SABA

- Dec 25, 2025
- 63 min read
1 . TRADITIONAL CHRISTMAS PUDDING
Classic British Steamed Christmas Pudding
Rich, dark, and deeply spiced — the traditional way
Serves:8
Prep Time:30 minutes
Soaking Time: Overnight (8–12 hours)
Cook Time:4–5 hours (steaming)
Total Time: Approximately 5 hours, plus soaking time

Ingredients
1 cup raisins
1 cup currants
½ cup sultanas
½ cup chopped dates or prunes
¼ cup candied peel
½ cup dark rum or brandy
½ cup fresh breadcrumbs
½ cup brown sugar
½ cup suet or grated cold butter
¼ cup all-purpose flour
¼ tsp salt
1 tsp cinnamon
½ tsp nutmeg
½ tsp allspice
Zest of 1 orange
2 large eggs
¼ cup molasses or treacle
¼ cup milk
Step-by-Step Instructions
Step 1: Soak the Fruit (Very Important)
Begin by gathering all the necessary dried fruits, which include raisins, currants, sultanas, dates, and candied peel. It is essential to use high-quality fruits to ensure the best flavor and texture in your final dish. These fruits not only add sweetness but also contribute a variety of textures and colors, making your creation visually appealing.
Next, take your chosen spirits, whether it be rum or brandy, and pour it generously over the assortment of fruits in the bowl. The alcohol serves a dual purpose: it acts as a preservative and enhances the overall flavor profile of the fruits, allowing them to absorb the rich, aromatic notes of the liquor. Choose a good-quality rum or brandy that you enjoy drinking, as the flavor will intensify during the soaking process and ultimately influence the final taste of your dish.
Once the alcohol has been added, use a spoon or spatula to stir the mixture thoroughly. It is crucial to ensure that every piece of fruit is evenly coated with the liquid. This step is vital because the soaking process relies on each fruit absorbing the flavors of the alcohol, which will help to create a moist and flavorful base for your recipe. Take your time with this step to ensure that no fruit is left dry or unflavored.
After mixing, cover the bowl tightly with plastic wrap or a lid to prevent any air from entering. This will help to retain the moisture and flavors as the fruits soak. Allow the mixture to rest in a cool, dark place for a minimum of overnight (ideally 8 hours or more). During this soaking period, the fruits will plump up significantly, absorbing the alcohol and expanding in size. This not only enhances their sweetness but also builds a deep, rich flavor that will permeate your dish. The longer you allow the fruit to soak, the more pronounced the flavors will become, making this step a crucial part of the preparation process.
Step 2: Prepare the Dry Base
Begin by gathering all the essential dry ingredients for your mixture. In a large mixing bowl, add a generous amount of fresh breadcrumbs, which will serve as the foundation of your recipe, providing texture and structure. Next, incorporate a measured quantity of all-purpose flour, which will help bind the ingredients together and give the final product a satisfying consistency. Following that, sprinkle in some brown sugar, which not only adds sweetness but also contributes a rich, caramel-like flavor that enhances the overall taste. Don’t forget to add a pinch of salt, which is crucial for balancing the sweetness and bringing out the flavors of the other ingredients. To add warmth and depth to the mixture, include ground cinnamon, nutmeg, and allspice. These spices will infuse your dish with a comforting aroma and a hint of spice that evokes a sense of home. Finally, for a burst of freshness, grate some orange zest into the bowl. The citrus oils from the zest will brighten the mixture and provide a delightful contrast to the other flavors.
Once all the dry ingredients are in the bowl, take a moment to stir them together thoroughly. Use a large wooden spoon or a whisk to mix the components, ensuring that the breadcrumbs, flour, brown sugar, and spices are evenly distributed throughout the mixture. This step is crucial, as it prevents clumping and guarantees that each bite of your final product will be consistently flavored. Stirring until you achieve a uniform color and texture will help create a harmonious blend of flavors that will elevate your dish. Make sure to scrape the sides of the bowl to incorporate any ingredients that may have settled or stuck to the edges, ensuring that no part of the mixture is left unblended.
After achieving a well-mixed dry base, it’s time to add the fat component, which is essential for creating a moist and tender final product. You can choose to use suet, a traditional ingredient known for its rich flavor and excellent binding properties, or opt for grated butter, which will lend a creamy richness to the mixture. Regardless of your choice, add the suet or grated butter to the bowl. Using your fingers, gently rub the fat into the dry mixture, breaking it up and incorporating it evenly. This process is known as 'cutting in' and involves working the fat into the flour until the mixture resembles coarse crumbs. Be careful not to overwork the mixture, as you want to retain some small pieces of fat that will melt during cooking, creating a delightful texture in the finished dish. The goal is to achieve a crumbly consistency that will provide a perfect base for the next steps in your recipe.
Step 3: Add Wet Ingredients
In a separate bowl, begin by cracking the eggs into the container. Using a whisk, vigorously beat the eggs until they reach a smooth and uniform consistency, ensuring that both the yolks and whites are thoroughly blended. This step is crucial as it incorporates air into the mixture, which can help to create a fluffier texture in the final product.
Next, carefully measure out the molasses and pour it into the bowl with the whisked eggs. Molasses not only adds a rich, deep flavor to the mixture but also contributes moisture and a slight sweetness. Following this, add the milk, which can be whole, skim, or any alternative milk of your choice. The milk will help to thin out the mixture, making it easier to combine with the dry ingredients later. Whisk these wet ingredients together until they are completely integrated, ensuring a consistent blend without any lumps.
Once your wet mixture is ready, take a moment to prepare your dry ingredients, which should already be in a large mixing bowl. Carefully pour the combined wet ingredients into the bowl containing the dry ingredients. It is important to do this gradually to prevent any splashes and to maintain control over the mixing process.
Now, using a spatula or wooden spoon, begin to stir the mixture slowly. Start from the edges of the bowl and work your way toward the center, gently folding the wet ingredients into the dry. Be cautious not to overmix; you want to combine the ingredients just until no dry flour remains visible. This technique helps to ensure that the final batter remains light and airy, avoiding the development of gluten that can lead to a dense texture.
Step 4: Combine Everything
Add the soaked fruit (including any remaining liquid). This step is crucial as the soaking process not only rehydrates the fruits but also infuses them with additional flavors, enhancing the overall taste of your mixture. When you pour in the fruit along with any liquid, you are ensuring that the batter will have a moist and rich texture. Make sure to incorporate all the fruit pieces evenly to distribute their sweetness and flavor throughout the batter.
Fold gently until you get a thick, sticky batter. It is important to use a gentle folding technique rather than vigorous stirring. This method helps to maintain the airiness of the mixture, which is essential for achieving the right consistency. As you fold, you should aim to combine the ingredients without overworking the batter, which could lead to a denser final product. The goal here is to create a uniform blend where the fruit is evenly distributed, and the mixture starts to take on a cohesive, thick form.
The mixture should be dense but spoonable. At this stage, you want to achieve a consistency that allows the batter to hold its shape while still being easy to scoop. You should be able to drop spoonfuls onto your baking surface without the mixture spreading too much. If it feels too dry, you might want to add a little more liquid, but be cautious not to make it too runny. The ideal texture will allow for the batter to rise beautifully during baking, resulting in a delightful treat that is both flavorful and satisfying.
Step 5: Prepare the Pudding Basin
Begin by greasing a heatproof pudding bowl generously with butter. This step is crucial as it not only helps to prevent the pudding from sticking to the bowl but also contributes to a rich flavor. Ensure that you cover the entire interior surface of the bowl, including the bottom and the sides, using a generous amount of butter. For best results, use unsalted butter, as it will enhance the overall taste of the pudding without adding any unwanted saltiness.
Next, take your prepared mixture and spoon it into the greased bowl. As you do this, make sure to press the mixture gently but firmly to eliminate any air pockets that may have formed. This will help create a denser texture in the final pudding. It’s important to distribute the mixture evenly throughout the bowl to ensure consistent cooking and a uniform texture. If you have a spatula, it can be helpful to use it to smooth the surface of the mixture once it’s in the bowl.
When filling the bowl, be mindful to leave about 1 inch of space at the top for expansion during the cooking process. This space is essential because, as the pudding cooks, it will rise and expand, and if the bowl is overfilled, it can lead to a messy overflow. Keeping this inch of space will allow the pudding to cook evenly and will also help maintain its shape once it is turned out of the bowl.
To protect the pudding during steaming or boiling, cover the top of the bowl with a circle of parchment paper. This layer acts as a barrier against moisture, which can affect the texture of the pudding. After placing the parchment paper on top, follow up by covering it with a layer of foil. The foil will provide an additional layer of protection, ensuring that steam does not penetrate the pudding, thus maintaining its rich, moist consistency.
Finally, secure the cover in place by tying it tightly with a kitchen string. This step is vital to prevent the parchment and foil from coming loose during the cooking process. Make sure the string is tied firmly but not so tightly that it distorts the shape of the bowl. A good knot will keep everything in place, allowing the pudding to cook properly while retaining its moisture and flavor. This preparation is essential for achieving a perfectly cooked pudding that can be easily removed from the bowl once it’s done.
Step 6: Steam the Pudding
Begin by placing a folded cloth at the bottom of a large pot. This cloth serves a crucial purpose: it acts as a buffer between the pot's bottom and the pudding bowl, preventing direct contact that could lead to scorching or uneven cooking. Ensure that the cloth is large enough to provide a stable base for the bowl, and consider using a clean kitchen towel or a piece of muslin for this step.
Next, carefully set the pudding bowl on top of the cloth. Make sure that the bowl is stable and centered to avoid any tipping during the steaming process. The pudding bowl should ideally be heatproof and suitable for steaming, as this will ensure it withstands the prolonged exposure to steam and heat without cracking or breaking.
Now, pour boiling water into the pot until it reaches halfway up the sides of the pudding bowl. The water must be boiling before you add it, as this helps to initiate the steaming process immediately. Be cautious while pouring to avoid splashing hot water, and ensure that the water level is consistent around the bowl to allow for even cooking. If the water level is too low, the pudding may not steam properly; if it's too high, it could overflow into the bowl.
Once the water is added, cover the pot with a lid. A tight-fitting lid is important to trap the steam inside, creating a moist environment that is essential for cooking the pudding thoroughly. If your pot does not have a good lid, you can also use aluminum foil to cover the top, ensuring it is secure and preventing steam from escaping during the steaming process.
Steam the pudding gently for 5 hours, a process that requires patience and attention. During this time, the pudding will rise and develop its unique texture and flavors. It is advisable to check the water levels occasionally, about every hour or so, to ensure that the pot does not run dry. If the water level appears low, carefully add more boiling water to maintain the halfway mark. This consistent steaming is key to achieving a perfectly cooked pudding, rich in flavor and moist in texture.
Step 7: Cool and Store
Once the pudding has been removed from the heat source, take care to handle it gently to avoid any damage to its structure. Allow the pudding to cool completely at room temperature. This step is crucial as it helps the flavors to meld together, enhancing the overall taste of the pudding. To expedite the cooling process, you can place the pudding in a well-ventilated area, ensuring that air circulates it effectively.
After the pudding has cooled down, it is important to replace the parchment paper and foil that were used during the steaming process. This ensures that the pudding is well-protected from any potential contaminants and maintains its moisture. Use fresh parchment paper to wrap the pudding securely, followed by a layer of aluminum foil to protect it from light and air, which can lead to spoilage. Make sure that the wrapping is tight enough to prevent any air from entering while still allowing for a bit of expansion as the pudding settles.
Once wrapped, find a suitable storage location for your pudding. Ideally, it should be kept in a cool, dark place, such as a pantry or cellar, where temperatures remain stable and low. This will help preserve the pudding's quality and flavor for an extended period. Under these conditions, the pudding can be stored for up to 2 months, making it a convenient option for holiday preparations. Just be sure to label your storage container with the date it was made, so you can keep track of its freshness.
Step 8: Reheat Before Serving
When it comes time to serve your delicious pudding, it is essential to reheat it properly to ensure it is warm and inviting. On Christmas Day, plan to steam the pudding again for approximately 1–2 hours. This method not only warms the pudding thoroughly but also helps to restore its moist texture. To steam, place the pudding back into a steamer or a large pot filled with simmering water, ensuring that the water level is sufficient to provide steam without touching the pudding itself. Cover the pot with a lid to trap the steam and heat effectively.
Once heated, serve the pudding warm to elevate the experience. It pairs beautifully with a variety of accompaniments, such as rich custard, which adds a creamy texture, or brandy butter, which provides a delightful sweetness and a hint of warmth from the alcohol. Alternatively, a dollop of fresh cream can enhance the pudding’s flavors and create a luxurious dessert experience. Whichever option you choose, serving the pudding warm will ensure that it is at its most enjoyable and satisfying for your guests, making your holiday gathering even more special.
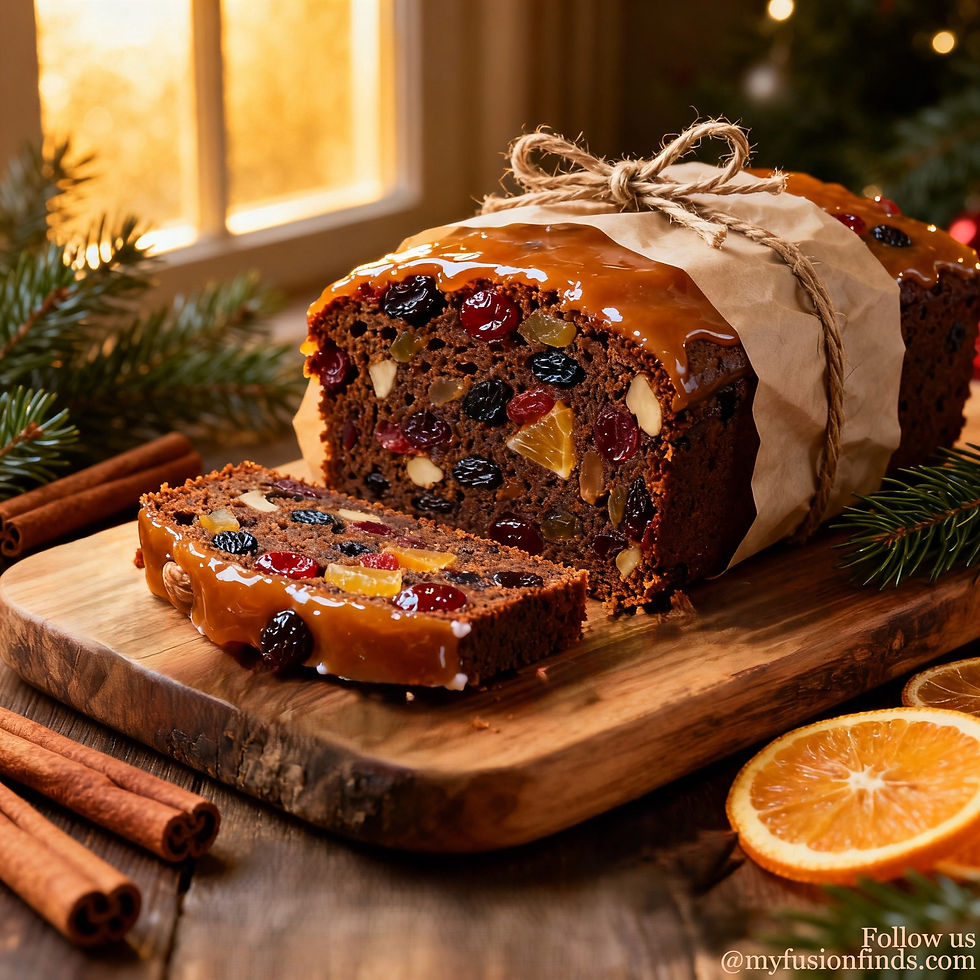
2 . TRADITIONAL CHRISTMAS FRUITCAKE
Rich, Dark, Old-Fashioned Christmas Fruitcake
Dense, moist, and perfect for aging
Serves:12–16
Prep Time:30 minutes
Soaking Time: Overnight (8–12 hours)
Cook Time:2½–3 hours (slow baking)
Total Time:Approximately 3½ hours, plus soaking & aging time

Ingredients
3 cups mixed dried fruit
½ cup chopped almonds or walnuts
½ cup candied peel
½ cup dark rum or brandy
1 cup unsalted butter, softened
1 cup brown sugar
4 large eggs
1¾ cups all-purpose flour
1 tsp baking powder
1 tsp cinnamon
½ tsp nutmeg
¼ tsp cloves
Zest of 1 orange or lemon
Step-by-Step Instructions
Step 1: Soak the Fruit
Begin by gathering your ingredients, which should include a variety of dried fruits such as raisins, apricots, and cranberries, as well as a selection of nuts like walnuts or almonds. You may also want to add some candied peel for an extra burst of flavor. Choose a suitable alcohol, such as rum, brandy, or whiskey, that will complement the sweetness of the fruits.
In a large mixing bowl, combine all the dried fruit, nuts, and candied peel. Pour the alcohol over the mixture, ensuring that all the ingredients are well-coated. This soaking process will not only enhance the flavors but also help to rehydrate the dried fruit, making it plumper and more enjoyable in your final dish. Stir the mixture thoroughly to ensure even distribution of the alcohol and flavors, and then cover the bowl with a lid or plastic wrap to prevent any contamination or drying out.
Allow the mixture to soak for a minimum of overnight, but if time permits, extending the soaking period to up to 24 hours can significantly deepen the flavors. During this time, the dried fruits will absorb the alcohol and moisture, resulting in a rich and flavorful blend that will enhance your recipe, whether you are using it for baking, cooking, or as a topping. Remember to give the mixture a gentle stir occasionally, if possible, to ensure that all pieces are evenly soaked and infused with the alcohol.
Step 2: Prepare the Pan and Oven
Begin by preheating your oven to 300°F (150°C). This temperature is crucial as it allows for a slow and even cooking process, ensuring that your dish develops the perfect texture and flavor. It is advisable to give your oven sufficient time to reach the desired temperature before placing your pan inside. This preheating step not only helps in achieving the right cooking environment but also aids in the proper rising of baked goods, contributing to a light and fluffy outcome.
Next, take a loaf or round pan, depending on your recipe requirements, and line it with parchment paper. This step is essential as it creates a non-stick surface, making it easier to remove your baked item once it is finished cooking. To line the pan, cut a piece of parchment paper to fit the bottom and sides of the pan. You may want to leave some overhang on the sides, as this will help you lift the finished product out of the pan without any hassle. Additionally, ensure that the parchment paper is smooth against the surface to avoid any creases that might affect the final shape of your dish.
For added protection against burning, consider double-lining the sides of the pan. This involves placing a second layer of parchment paper on top of the first, which creates an extra barrier between the heat source and your batter or dough. This technique is particularly useful for recipes that require longer baking times or those that are prone to browning too quickly around the edges. By double-lining, you significantly reduce the risk of overcooking and ensure a more evenly baked final product. Make sure that both layers are securely positioned in the pan to prevent any slipping during the baking process.
Step 3: Cream Butter and Sugar
Begin by placing the unsalted butter, which should be at room temperature for optimal mixing, and the granulated sugar into a large mixing bowl. It is crucial to ensure that the butter is softened adequately; this allows for easier incorporation of air into the mixture, which is essential for achieving the desired texture in your cake. If the butter is too cold, it will not cream properly with the sugar, resulting in a denser cake.
Using an electric mixer or a sturdy whisk, beat the butter and sugar together for a duration of 3–4 minutes. Start at a low speed to prevent the sugar from flying out of the bowl, gradually increasing to medium speed. During this time, you should observe the mixture transforming from a dense, gritty substance into a light and fluffy consistency. This process, known as creaming, is vital as it incorporates air into the butter, which will expand during baking, helping the cake rise and creating a tender crumb.
It is important to note that this step not only contributes to the cake's lightness but also plays a significant role in enhancing the overall flavor. The sugar crystals cut into the butter, creating small pockets of air, and this aeration is what ultimately helps to keep the cake tender. Additionally, the creaming process allows the sugar to dissolve more effectively, which can lead to a smoother batter. Therefore, do not rush this step; taking the time to properly cream the butter and sugar will yield a superior cake that is both delicious and has the perfect texture.
Step 4: Add Eggs Gradually
Add eggs one at a time. This step is crucial for achieving a smooth and well-emulsified batter. By introducing the eggs individually, you allow each one to fully incorporate into the mixture before adding the next. This gradual process helps to maintain the integrity of the batter, ensuring that the fats and liquids blend seamlessly, which is essential for the final texture of your baked goods. It also prevents the mixture from becoming too heavy or dense, which can occur if all the eggs are added at once.
Beat well after each addition. After adding each egg, it is important to beat the mixture thoroughly. This not only ensures that the egg is fully integrated but also helps to introduce air into the batter, which is vital for leavening and achieving a light and fluffy final product. Use a whisk or an electric mixer on medium speed to beat the mixture until it is smooth and homogenous. The mixture should become slightly lighter in color and texture as you incorporate the eggs, indicating that air is being successfully whipped into the batter.
If the mixture curdles, add 1 tbsp of flour. Sometimes, despite careful mixing, the batter may curdle, which can happen due to temperature differences between the ingredients or if the eggs are added too quickly. If this occurs, don’t panic; you can salvage the mixture by adding a tablespoon of flour. This addition will help to stabilize the batter and absorb excess moisture, allowing it to come back together. After adding the flour, continue to beat the mixture until it is smooth again. This step is essential to ensure that your final product has the desired consistency and does not result in a lumpy or uneven texture.
Step 5: Mix Dry Ingredients
In another bowl, begin by carefully measuring out the flour. It is crucial to use the correct amount, as too much flour can lead to a dense texture in your final product. Once measured, sift the flour to aerate it, which helps to ensure a lighter and fluffier outcome. Next, add the baking powder to the flour. This ingredient is essential for providing the necessary lift during the baking process. Additionally, incorporate any spices that your recipe calls for, such as cinnamon, nutmeg, or ginger, depending on the flavor profile you desire. These spices not only enhance the taste but also add aromatic qualities that make your dish more appealing. Finally, if your recipe includes citrus zest, such as lemon or orange, grate it finely and mix it into the dry ingredients. The zest will introduce a burst of fresh flavor that complements the other components beautifully.
Once all the dry ingredients are thoroughly combined in the bowl, it is time to incorporate them into the wet batter. This process should be done gradually to maintain the integrity of the batter. Start by adding a small portion of the dry mixture to the wet ingredients, and use a spatula or a wooden spoon to gently fold it in. Be careful not to overmix, as this can develop the gluten in the flour, resulting in a tougher texture. Instead, aim for a smooth and homogeneous batter, where no dry flour remains visible. Repeat this process, adding the dry ingredients in increments, until everything is fully combined. This gradual mixing technique ensures that the flavors meld together seamlessly and that the batter achieves the perfect consistency for baking.
Step 6: Fold in the Fruit
Add soaked fruit and nuts. Begin this step by ensuring that the fruit and nuts you have chosen are well-prepared. If you are using dried fruit, such as raisins, apricots, or cranberries, it is essential to soak them in warm water, juice, or even a splash of your favorite liquor for about 15 to 30 minutes. This soaking process not only plumps up the fruit, making it juicier and more flavorful, but it also helps to integrate the flavors into the batter more effectively. Once soaked, drain the fruit thoroughly to remove any excess liquid, as too much moisture can alter the texture of your batter. Next, chop the nuts if they are whole, ensuring that they are evenly sized to facilitate even distribution throughout the batter. When you are ready, gently fold the soaked fruit and chopped nuts into the batter, taking care to incorporate them without overmixing, which could lead to a denser final product.
Stir gently until evenly distributed. As you begin to fold the fruit and nuts into the batter, use a spatula or a wooden spoon to carefully lift and turn the mixture. This technique is crucial as it helps maintain the airiness of the batter, which is particularly important for achieving a light and fluffy texture in your baked goods. Aim to rotate the bowl as you fold, ensuring that the fruit and nuts are evenly dispersed throughout the batter. It may take a few moments to achieve a uniform distribution, but patience is key here. You want to see bits of fruit and nuts throughout the batter, which will not only enhance the flavor but also provide a delightful texture contrast in every bite. Be mindful to avoid aggressive stirring, which can break down the fruit and nuts, leading to a less appealing final product.
The batter will be thick. As you complete the folding process, you will notice that the batter has a notably thick consistency. This thickness is a good sign, indicating that the ingredients are well-combined and ready for the next step in the baking process. A thicker batter often leads to a denser and more satisfying texture in the finished dish, allowing it to hold the fruit and nuts securely in place during baking. If you find that the batter seems too thick, you may consider adding a small amount of liquid, such as milk or water, to achieve your desired consistency; however, be cautious not to add too much, as this could alter the intended texture. Once you are satisfied with the thickness and consistency of the batter, you can proceed to the next step in your recipe, confident that the flavors of the fruit and nuts are well integrated into your mixture.
Step 7: Bake Slowly
Spoon the prepared batter into the pan that has been greased and lined, ensuring an even distribution to promote uniform baking.
Using a spatula or the back of a spoon, smooth the top of the batter gently to create a flat surface, which will help the cake rise evenly and achieve a beautifully polished finish once baked.
Place the pan in a preheated oven and bake for 2½–3 hours, keeping a close eye on the cake as it approaches the lower end of the time range. The long baking time allows the flavors to develop deeply, ensuring a moist and rich texture.
About halfway through the baking process, around the 1 to 1½ hour mark, cover the cake loosely with aluminum foil. This step is crucial as it prevents the top from browning too much or becoming overly dry, while still allowing the cake to continue cooking through the center.
Step 8: Cool and Mature
Once the baking time is complete, remove the cake from the oven and allow it to cool completely in the pan. This process can take several hours, but the cake needs to set properly and maintain its structure when removed.
After the cake has cooled thoroughly, carefully wrap it in a layer of parchment paper followed by a layer of aluminum foil. This dual wrapping will help to keep the cake fresh and prevent it from drying out, while also protecting it from any unwanted odors that may be present in your storage area.
To enhance the cake's flavor and ensure it matures beautifully, brush the surface with a small amount of alcohol, such as rum or brandy, every week. This not only adds depth to the flavor profile but also helps to keep the cake moist over time, allowing the ingredients to meld and develop a richer taste as it ages.
3 . Vegan Gluten-Free Steamed Christmas Pudding (Classic Style)
Rich, dark, traditional—without eggs, dairy, or gluten
Serves:6–8
Prep Time:25 minutes
Soaking Time: Overnight (8–12 hours)
Cook Time:3 hours (steaming)
Total Time: Approximately 3 hours 25 minutes, plus soaking time

Ingredients
1 cup raisins
1 cup currants
½ cup chopped dates
¼ cup candied peel (gluten-free)
½ cup dark rum or orange juice
¾ cup gluten-free breadcrumbs
½ cup coconut sugar or brown sugar
¼ cup almond flour
½ tsp cinnamon
½ tsp nutmeg
½ tsp allspice
Zest of 1 orange
¼ cup coconut oil, melted
¾ cup unsweetened applesauce
2 tbsp ground flaxseed + 5 tbsp water
Step-by-Step Instructions
Step 1: Soak the Fruit
Begin by gathering all the dried fruit you intend to use, such as raisins, apricots, cranberries, and figs, along with any citrus peels you might want to incorporate for added flavor. Ensure that you have a large enough bowl to accommodate all of the ingredients without overcrowding, as this will make the mixing and soaking process much easier.
Once you have placed the dried fruit and peel into the bowl, select a high-quality rum or a suitable juice, such as orange or apple juice, as your soaking liquid. Carefully pour the chosen liquid over the fruit, ensuring that all pieces are adequately covered. This soaking process is crucial, as it allows the dried fruit to rehydrate and absorb the flavors of the liquid, enhancing the overall taste and texture of the final dish.
After pouring the rum or juice, gently stir the mixture using a spatula or wooden spoon, making sure that all the fruit is evenly coated in the liquid. Once mixed, cover the bowl with plastic wrap or a clean kitchen towel to prevent any contaminants from getting in and to keep the moisture locked in. It is essential to let the fruit soak for a minimum of overnight, as this extended period allows the flavors to meld beautifully and ensures that the dried fruit becomes plump and juicy, ready to be used in your recipe.
Step 2: Make Flax Eggs
To begin the process of making flax eggs, start by measuring out the appropriate amount of ground flaxseed. Typically, you will need about one tablespoon of ground flaxseed for each egg you are replacing in your recipe. Once you have measured the flaxseed, please place it in a small mixing bowl. Next, add three tablespoons of water to the bowl with the flaxseed. It is crucial to ensure that the flaxseed is finely ground, as this will help to create a smoother texture and a better binding effect in your final dish. If you do not have ground flaxseed, you can easily make your own by blending whole flaxseeds in a blender or food processor until they reach a fine powder consistency.
After combining the flaxseed and water, stir the mixture thoroughly to ensure that the flaxseed is evenly distributed throughout the water. Once mixed, allow the mixture to sit at room temperature for approximately 10 minutes. During this time, the flaxseed will absorb the water and swell, creating a gel-like consistency that mimics the binding properties of eggs in baking. This gel is what will help to hold your ingredients together, making it an excellent substitute for eggs in vegan and egg-free recipes. After the waiting period, give the mixture another quick stir before using it in your recipe, ensuring that it remains well combined and ready to fulfill its role as an egg replacer.
Step 3: Combine Dry Ingredients
In a large mixing bowl, begin the process of combining your dry ingredients. Start by adding the breadcrumbs, which can be either store-bought or homemade, depending on your preference. The breadcrumbs will provide texture and structure to your dish. Next, add the sugar, which will not only sweeten your mixture but also contribute to the overall moisture and flavor profile. Following the sugar, incorporate almond flour, which adds a nutty flavor and enhances the richness of the dish. It is important to use finely ground almond flour to ensure a smooth texture.
In addition to these main ingredients, consider adding a variety of spices to elevate the flavor of your mixture. Common options include cinnamon, nutmeg, or ginger, depending on the flavor profile you are aiming for. Each of these spices will bring its unique warmth and complexity to the final dish. Furthermore, if your recipe calls for citrus zest, such as lemon or orange, be sure to incorporate it at this stage. The zest will add a burst of freshness and brightness that will complement the other flavors beautifully.
Once all the dry ingredients are added to the bowl, use a whisk or a fork to mix them thoroughly. This step is crucial, as it ensures that the ingredients are evenly distributed, preventing any clumps and allowing for a uniform texture in your final product. Take your time to combine the mixture well, as this will greatly enhance the overall outcome of your baking endeavor.
Step 4: Add Wet Ingredients
Begin by gently stirring the melted coconut oil into the dry mixture. The coconut oil not only adds a rich flavor but also helps to bind the ingredients together, creating a cohesive batter. Make sure the oil has cooled slightly before adding it to prevent cooking any of the dry ingredients. Next, incorporate the applesauce, which serves as a natural sweetener and moisture enhancer. This ingredient is particularly beneficial for those looking to reduce refined sugars in their recipes while still achieving a delightful sweetness and a moist texture. Following the applesauce, add the prepared flax eggs—made by mixing ground flaxseed with water and allowing it to sit until it reaches a gel-like consistency. This vegan substitute for traditional eggs acts as a binding agent, helping to hold the mixture together and contributing to a tender crumb. As you combine these wet ingredients with the dry mixture, use a spatula or wooden spoon to ensure an even distribution, taking care to scrape the sides of the bowl to incorporate all elements thoroughly. The goal is to create a well-blended mixture that is smooth and free of lumps, setting the stage for the next steps in your recipe.
Step 5: Add Fruit
Once your wet ingredients are fully integrated into the batter, it’s time to fold in the soaked fruit. If you are using dried fruits such as raisins, cranberries, or chopped dates, soaking them in warm water or juice beforehand helps to plump them up, enhancing their flavor and texture. This step not only adds bursts of sweetness and moisture to your final product but also ensures that the fruit is evenly distributed throughout the batter. As you add the soaked fruit along with any residual liquid, be mindful to fold gently to avoid breaking down the fruit too much, which could lead to a mushy texture. The goal is to incorporate the fruit without compromising the integrity of the batter.
After adding the fruit, continue to mix the batter until it reaches a thick and sticky consistency. This texture is crucial as it indicates that the dry ingredients have absorbed the moisture from the wet ingredients and the fruit. A thick batter will help the final product rise properly during baking, creating a delightful texture that is both hearty and satisfying. Use a spatula to scrape down the sides of the bowl once more, ensuring that everything is well combined. At this stage, you can also taste the batter and adjust any flavors if necessary, perhaps adding a pinch more cinnamon or a splash of vanilla extract to enhance the overall flavor profile. The result should be a rich, fragrant batter that is ready for the next step in your baking process.
Step 6: Fill & Steam
Begin by greasing the pudding basin thoroughly. It is essential to use a generous amount of butter or a non-stick cooking spray to ensure that the pudding can be easily removed once it is cooked. Pay special attention to the corners and the bottom of the basin, as these areas can often be prone to sticking.
Next, carefully fill the greased pudding basin with your prepared mixture. It is important to leave about 1 inch of space at the top of the basin. This gap allows for the pudding to expand as it cooks and prevents any overflow that could result in a messy steaming process. Make sure to level off the mixture gently to ensure even cooking.
Once the basin is filled, cover the top securely with a layer of parchment paper. This will help to protect the pudding from excess moisture while it steams. After placing the parchment, add a layer of aluminum foil on top, ensuring it is tightly secured around the edges. This double-layer covering is crucial for maintaining the right environment for steaming, as it helps to trap heat and moisture while preventing water from dripping into the pudding.
Now, it’s time to steam the pudding gently. Place the covered pudding basin in a large pot or steamer filled with simmering water. The water level should be high enough to come halfway up the sides of the basin, but not so high that it risks spilling over into the pudding. Cover the pot with a lid and allow the pudding to steam for a duration of 4½ hours. During this time, check occasionally to ensure that the water level remains adequate, adding more boiling water as needed to maintain the steam.
Step 7: Cool & Reheat
After the steaming time is complete, carefully remove the pudding basin from the pot using tongs or an oven mitt, as it will be hot. Let the pudding cool completely at room temperature. This cooling process is vital, as it allows the flavors to settle and helps the texture to firm up, making it easier to handle when you are ready to serve it.
Once the pudding has cooled, wrap it tightly in plastic wrap or aluminum foil to keep it fresh. Proper storage is important to prevent the pudding from drying out or absorbing unwanted odors from the refrigerator. Store the wrapped pudding in a cool, dry place or in the refrigerator if you plan to keep it for an extended period.
When you are ready to serve the pudding, it is essential to re-steam it to ensure it is warmed through and has the right texture. Place the wrapped pudding back into the steamer or pot of simmering water and steam for an additional 1 hour. This step not only reheats the pudding but also revitalizes its moistness, making it a delicious treat for your guests or family.
4 . Vegan Gluten-Free Christmas Fruitcake (Aged Style)
Dense, sliceable, perfect for gifting
Serves:12
Prep Time:30 minutes
Soaking Time: Overnight (8–12 hours)
Cook Time:2½–3 hours (baking)
Total Time:Approximately 3½ hours, plus soaking & aging time

Ingredients
3 cups mixed dried fruit
½ cup chopped walnuts
½ cup candied peel (GF)
½ cup brandy or apple juice
1½ cups almond flour
¾ cup gluten-free flour blend
1 tsp baking powder
1 tsp cinnamon
½ tsp nutmeg
½ cup coconut sugar
½ cup melted coconut oil
¾ cup applesauce
Step-by-Step Instructions
Step 1: Soak Fruit
Begin by selecting a variety of dried fruits such as raisins, apricots, cranberries, and cherries. Additionally, include a mix of nuts like walnuts, almonds, and pecans for added texture and flavor. To enhance the overall taste, consider incorporating candied citrus peel, which adds a delightful zing. Combine all these ingredients in a large mixing bowl, ensuring an even distribution. To this mixture, pour in your choice of liquid; this could be fruit juice, rum, or even a flavored syrup, depending on your preference and the flavor profile you wish to achieve.
Once all the ingredients are combined, cover the bowl with plastic wrap or a clean kitchen towel and let the mixture sit for an extended period. Soaking the fruit and nuts overnight is crucial as it allows them to absorb the liquid fully, resulting in a plumper, more flavorful addition to your final dish. This soaking process not only enhances the taste but also helps to soften the dried fruit, making it more enjoyable in the final baked product.
Step 2: Prepare the oven
Before you begin mixing your ingredients, it is essential to prepare your oven to ensure even baking. Preheat your oven to 300°F (150°C). This low temperature is ideal for slow baking, allowing the flavors to meld beautifully without burning the ingredients. It’s a good practice to check your oven's accuracy with an oven thermometer, as some ovens may run hotter or cooler than the set temperature.
While the oven is preheating, take the time to prepare your loaf pan. Line the pan generously with parchment paper, allowing some overhang on the sides. This will not only prevent the baked goods from sticking but also make it easier to remove the loaf once it’s baked. For added assurance against sticking, you may also choose to grease the pan lightly with coconut oil or butter, ensuring that your delicious creation comes out intact and ready to be sliced.
Step 3: Mix Dry Ingredients
In a separate mixing bowl, gather your dry ingredients. Start by measuring out the appropriate amounts of different flours; this could include all-purpose flour, whole wheat flour, or even gluten-free alternatives if desired. Next, add in the sugar, which can be granulated, brown, or a combination of both for depth of flavor. To this mixture, incorporate a selection of spices such as cinnamon, nutmeg, and ginger to infuse warmth and complexity into your loaf. Finally, add the baking powder, ensuring it is evenly distributed throughout the dry mixture. Whisk these ingredients together thoroughly to avoid any clumps, creating a uniform blend that will help your loaf rise beautifully during baking.
Step 4: Mix Wet Ingredients
In another bowl, focus on your wet ingredients. Begin by measuring out the coconut oil, which should be melted if it’s solidified. Combine it with unsweetened applesauce, which not only adds moisture but also contributes natural sweetness to your loaf. Using a whisk or a fork, stir these two ingredients together until they form a smooth and homogenous mixture. This step is important as it ensures that the coconut oil is evenly distributed, preventing any oily pockets in your final product. If desired, you can also add a splash of vanilla extract or a hint of almond extract for added flavor, creating a rich base for your loaf.
Step 5: Combine Batter
Mix wet into dry. Begin by carefully adding your previously prepared wet ingredients, which may include eggs, milk, and any melted butter or oil, into the bowl containing your dry ingredients, such as flour, sugar, baking powder, and salt. It is essential to combine these mixtures gently to avoid overmixing, which can lead to a dense texture in the final product. Use a spatula or wooden spoon to fold the ingredients together until just combined, ensuring that no dry patches or lumps remain. The goal is to achieve a homogeneous batter without overworking it, as this will help maintain a light and airy consistency.
Fold in fruit. After the wet and dry ingredients are well combined, it’s time to incorporate the fruit into the batter. This can include fresh berries, chopped apples, bananas, or any other fruit of your choice. Gently fold the fruit into the batter using a spatula, being careful not to break the fruit pieces apart or overmix the batter. This step is crucial as it not only adds flavor and moisture to the batter but also contributes to the visual appeal of the final baked good. Ensure that the fruit is evenly distributed throughout the batter for balanced flavor in every bite.
Step 6: Bake Slowly
Spoon into the pan. Once your batter is ready, prepare your baking pan by greasing it lightly or lining it with parchment paper to prevent sticking. Using a ladle or a large spoon, carefully transfer the batter into the prepared pan. Make sure to fill the pan evenly, leaving some space at the top, as the batter will rise during the baking process. If you are using a loaf pan, smooth the top with a spatula for an even bake. This step is vital for achieving a uniform texture and appearance in the finished product.
Bake 2–2½ hours. Preheat your oven to the appropriate temperature, usually around 325°F (165°C), which allows for a slow and steady baking process. Place the pan in the oven and set a timer for the baking duration of 2 to 2½ hours. It’s important to keep an eye on the baking progress, as oven temperatures can vary. You can check for doneness by inserting a toothpick or cake tester into the center of the baked good; it should come out clean or with a few moist crumbs attached, indicating that it is ready to be removed from the oven.
Cover loosely if browning. During the baking process, if you notice that the top of your batter is browning too quickly, you can loosely cover it with aluminum foil. This will prevent the top from burning while allowing the inside to continue baking thoroughly. It’s a delicate balance to achieve the perfect golden-brown crust without sacrificing the moisture and texture of the interior. Monitoring the baking closely during the last half hour will help you make this adjustment if necessary.
Step 7: Mature
Cool fully. Once your baked good has reached the desired level of doneness, remove it from the oven and allow it to cool in the pan for about 15 to 20 minutes. After this initial cooling period, carefully transfer it to a wire rack to cool completely. Cooling is an essential step, as it allows the flavors to develop and the texture to set properly. Avoid cutting into it while it is still warm, as this can lead to a crumbly or uneven slice.
Wrap tightly. After the baked good has cooled completely, it’s important to preserve its freshness and flavor. Wrap it tightly in plastic wrap or aluminum foil to prevent air exposure, which can lead to drying out. If you are storing it for an extended period, consider placing it in an airtight container. Proper wrapping not only helps maintain the moisture but also keeps the flavors intact, ensuring that every slice remains delicious.
Feed with juice or alcohol weekly. To enhance the flavor and prolong the shelf life of your baked good, consider 'feeding' it weekly with a splash of juice or alcohol, such as rum or brandy. This process involves lightly soaking the wrapped baked good with the chosen liquid, which infuses it with moisture and additional flavor. This step is particularly popular with fruitcakes and similar recipes, as it helps to mature the flavors over time, making the final product even more delightful when served. Ensure that you do this gently to prevent the cake from becoming soggy.
5 . Vegan Sticky Date Christmas Pudding (Gluten-Free)
Serves:6–8
Prep Time:20 minutes
Soaking Time:10 minutes (dates)
Cook Time:2½ hours (steaming)
Total Time: Approximately 2 hours 50 minutes

Ingredients
1½ cups chopped dates
1 cup hot almond milk
¾ cup gluten-free oat flour
½ cup ground almonds
½ cup maple syrup
½ tsp cinnamon
¼ tsp nutmeg
1 tsp baking soda
¼ cup coconut oil, melted
Step-by-Step Instructions
Step 1: Prepare Dates
Begin the process by taking a selection of fresh, pitted dates, which are not only naturally sweet but also packed with nutrients. Place these chopped dates into a heatproof bowl that can withstand high temperatures. Next, carefully pour hot almond milk over the chopped dates. The heat from the almond milk will help to release the natural sugars and flavors from the dates, making them more pliable and easier to blend.
Allow the dates to soak in the hot almond milk for a duration of 10 minutes. This soaking period is crucial as it enables the dates to soften significantly, which enhances their texture and ensures they will blend smoothly into the mixture later. During this time, you may notice the dates absorbing some of the almond milk, which will contribute to a richer flavor profile in your final product.
Step 2: Blend Dates
Once the soaking time has elapsed, it's time to transform the softened dates into a creamy base. Use a blender or food processor for this step; both appliances are well-suited for creating a smooth, thick mixture. Carefully pour the soaked dates along with the almond milk into the blender. Blend the mixture on high speed until it reaches a smooth, thick consistency, ensuring that there are no lumps remaining. This step is essential as the pureed dates will serve as a natural sweetener and binder in your recipe, adding both moisture and flavor.
Step 3: Combine Dry Ingredients
While the dates are being blended, you can prepare the dry ingredients simultaneously. In a separate large mixing bowl, combine all the necessary dry ingredients to ensure an even distribution of flavors and textures. These ingredients include:
Gluten-free oat flour, which will provide the primary structure for your recipe while keeping it suitable for those with gluten sensitivities. The oat flour adds a mild flavor and a tender crumb.
Ground almonds, which not only enhance the nutty flavor but also contribute healthy fats and proteins to the mix, make your dish more nutritious.
Cinnamon, a warm spice that adds depth and richness to the overall flavor profile, creates a comforting aroma that will entice anyone nearby.
Nutmeg, which complements the cinnamon and adds a hint of earthiness, elevates the taste of your mixture to new heights.
Baking soda, a crucial leavening agent that helps your final product rise and achieve the desired fluffy texture. It reacts with the moisture and acidity present in the mixture, creating bubbles that will lighten the batter.
Step 4: Mix Wet and Dry Ingredients
Begin by carefully pouring the date-almond milk puree into the bowl containing the dry ingredients. Ensure that you scrape the sides of the container to incorporate all of the puree, as it adds natural sweetness and moisture to the mixture.
Next, add the maple syrup, which not only enhances the flavor profile with its rich, caramel-like sweetness but also contributes additional moisture to the batter. Follow this by incorporating the melted coconut oil, which adds a subtle coconut flavor and helps to bind the ingredients together, resulting in a cohesive mixture.
Using a spatula or wooden spoon, mix the ingredients thoroughly until a thick, sticky batter forms. It is important to ensure that there are no dry patches of flour remaining, as this will affect the texture of the final pudding. The batter should be smooth and well combined, exhibiting a consistency that allows it to hold its shape when spooned into the pudding basin.
Step 5: Prepare Pudding Basin
To start, take a pudding basin or heatproof bowl and generously grease it with coconut oil or a non-stick spray. This step is crucial as it prevents the pudding from sticking to the sides of the basin, allowing for easy removal once it’s cooked. Make sure to cover the entire surface, including the bottom and edges.
Next, carefully spoon the prepared batter into the basin, ensuring that it is distributed evenly. This will help the pudding cook uniformly, resulting in a consistent texture throughout. Use a spatula to smooth the top of the batter if necessary, creating a flat surface.
Once the batter is in place, cover the top of the basin securely with greaseproof paper, followed by a layer of aluminum foil. This double-layered covering is essential to protect the pudding from moisture during the steaming process. If needed, use a string to secure the foil tightly around the basin, ensuring that no steam escapes during cooking.
Step 6: Steam the Pudding
To begin steaming, place the pudding basin in a steaming setup. This can be achieved by using a large saucepan equipped with a rack or trivet at the bottom. Fill the saucepan with enough water to reach halfway up the sides of the basin, which will create the necessary steam environment for cooking.
Ensure that the water is at the right level before you start the steaming process. Too much water can result in boiling over, while too little can cause the water to evaporate too quickly, which may lead to uneven cooking.
Once everything is set up, bring the water to a gentle simmer. It is important to maintain a consistent simmer throughout the steaming process, as this will ensure that the pudding cooks evenly and thoroughly without becoming waterlogged.
Allow the pudding to steam for a total of 2½ hours. During this time, periodically check the water level and add more hot water as necessary to prevent it from boiling dry. This is a crucial step, as maintaining adequate steam is essential for achieving the desired texture and flavor in your pudding.
Step 7: Cool Slightly and Serve
Once the pudding has finished steaming, it is essential to approach the removal process with care. Use oven mitts or a thick kitchen towel to grasp the steamer basket or pot, ensuring that you do not burn yourself on the hot surfaces. Gently lift the pudding out of the steamer and allow it to sit undisturbed for approximately 5–10 minutes. This resting period is crucial as it allows the pudding to set slightly, making it easier to handle and enhancing its texture, as the steam continues to escape and the pudding cools down just enough to be safe for serving.
After the resting period, you can choose to unwrap the pudding if it was covered during steaming. Carefully peel back any parchment paper or foil, taking care not to tear it and to avoid any hot steam that may escape. If you prefer a more visually appealing presentation, you can invert the pudding onto a serving plate. To do this, place the plate upside down on top of the pudding mold, then gently flip the mold over while tapping it lightly to help release the pudding. This technique not only enhances the aesthetic appeal of the dish but also allows any delicious syrup or sauce that may have formed during steaming to drizzle over the top, adding to the overall flavor experience.
For the final touch, serve the pudding while it is still warm. The warmth enhances the flavors and makes the texture even more delightful. Accompany the pudding with a selection of toppings to elevate the dish further. Options such as vegan custard, which provides a creamy and rich contrast, coconut cream, which adds a tropical flair and a hint of sweetness, or maple cream, which brings a unique depth of flavor with its natural sweetness, are all excellent choices. Each of these accompaniments not only complements the pudding but also allows for a personalized serving experience, catering to different taste preferences. Encourage your guests to enjoy the pudding with their chosen toppings, creating a delightful and indulgent dessert experience that is sure to please.
6 . Vegan Orange & Almond Christmas Fruitcake (Gluten-Free)
Serves:10–12
Prep Time:20 minutes
Soaking Time:30 minutes
Cook Time:1¼–1½ hours (baking)
Total Time: Approximately 1 hour 50 minutes

Ingredients
2 cups mixed dried fruit (raisins, cranberries, chopped apricots, etc.)
Zest and juice of 1 orange
1½ cups almond flour
½ cup gluten-free oat flour
¾ cup maple syrup
½ cup olive oil
1 tsp baking powder
½ tsp cinnamon
Step-by-Step Instructions
Step 1: Soak the Fruit
Begin by placing dried fruit of your choice, such as raisins, apricots, or cranberries, in a medium-sized bowl. This initial step is crucial as the dried fruit will absorb moisture and flavors, enhancing the overall taste of your dish.
Next, pour in the orange juice, ensuring that the fruit is adequately covered. Use freshly squeezed orange juice for the best flavor, if possible, as it will provide a vibrant and zesty essence. Gently toss the fruit in the juice to ensure that each piece is well-coated, allowing for an even infusion of flavor.
Once combined, let the fruit soak for 30 minutes. During this time, the dried fruit will expand and become plump, while simultaneously soaking up the citrusy notes of the orange juice. This soaking process not only enhances the texture of the fruit but also adds a delightful burst of flavor that will elevate your recipe to new heights. For optimal results, you can cover the bowl with plastic wrap to retain warmth and moisture.
Step 2: Preheat Oven and Prepare Pan
While the fruit is soaking, take the opportunity to prepare your baking environment. Preheat your oven to 325°F (165°C). This temperature is ideal for baking, allowing for even cooking without burning the outside of your dish. Make sure to allow enough time for the oven to reach the desired temperature before placing your dish inside.
Simultaneously, prepare your baking vessel. Grease a loaf pan thoroughly using butter or a non-stick cooking spray to prevent sticking. Alternatively, you can line the pan with parchment paper, which will facilitate easy removal of the baked goods once they are finished. If using parchment paper, ensure that it hangs over the edges of the pan slightly, as this will create convenient handles for lifting out the loaf after baking. This preparation step is vital for a successful baking experience, ensuring that your creation comes out intact and beautifully shaped.
Step 3: Mix Dry Ingredients
In a large mixing bowl, begin by thoroughly whisking together the following dry ingredients to ensure an even distribution of all components:
Almond flour: This flour is made from finely ground almonds and is a great gluten-free alternative to traditional wheat flour. It adds a nutty flavor and moist texture to baked goods, making it an excellent choice for various recipes.
Gluten-free oat flour: Made from ground oats, this flour not only contributes to the texture but also enhances the nutritional profile of your dish. It is rich in fiber and helps to bind the ingredients together, providing structure to your final product.
Baking powder: A crucial leavening agent, baking powder helps your baked goods rise and become light and fluffy. It's important to use a gluten-free variety to keep the recipe compliant with dietary restrictions.
Cinnamon: This warm spice adds a delightful flavor and aroma to your mixture. Beyond its taste, cinnamon also offers various health benefits, including anti-inflammatory properties and potential blood sugar regulation.
Once all the dry ingredients are combined, set the bowl aside. This will allow the flavors to meld slightly while you prepare the wet ingredients, ensuring a well-balanced final product.
Step 4: Mix Wet Ingredients
In a separate mixing bowl, begin the process of preparing your wet ingredients by whisking together the following components:
Maple syrup: This natural sweetener not only adds sweetness but also imparts a rich flavor that complements the other ingredients beautifully. Opt for pure maple syrup for the best taste and quality, as it provides a depth of flavor that processed sugars cannot replicate.
Olive oil: Using olive oil in your recipe contributes healthy fats and moisture, which are essential for achieving a tender texture. It also enhances the overall flavor profile, adding a subtle richness. Choose a high-quality extra virgin olive oil for the best results.
Orange zest: The zest from fresh oranges introduces a bright, citrusy note that elevates the flavor of your dish. It is important to use only the outer, colored part of the peel, as this contains the aromatic oils that provide the most intense flavor. Be sure to wash the orange thoroughly before zesting to remove any residues.
Once all the wet ingredients are combined, stir them together vigorously until the mixture is well blended. This step is crucial as it ensures that the flavors are evenly distributed throughout the batter, leading to a more harmonious taste in the final baked product.
Step 5: Combine Ingredients
Begin by carefully adding the wet mixture, which may consist of ingredients such as eggs, milk, or oil, to the bowl containing the dry ingredients, which typically include flour, sugar, baking powder, and any spices you may be using. It is important to stir gently at this stage to ensure that the two mixtures begin to blend without overworking the batter, as excessive mixing can lead to a denser final product. Use a wooden spoon or a spatula to incorporate the ingredients, making sure to scrape the sides and bottom of the bowl to capture all the dry ingredients.
Once the wet and dry ingredients are combined, it’s time to fold in the soaked fruit along with any remaining juice that has accumulated during the soaking process. The fruit not only adds flavor but also moisture to the batter, enhancing the overall texture. Gently lift and turn the mixture with your spatula, ensuring that the fruit is evenly distributed throughout the batter. This technique helps maintain the integrity of the fruit pieces while ensuring they are well incorporated, which is crucial for achieving a balanced taste in each slice.
Continue mixing until the batter is thick and moist, making sure there are no dry pockets of flour remaining. The final consistency should be somewhat thick but pourable, resembling that of a cake batter. Take a moment to observe the texture; it should be smooth and homogeneous, with the fruit pieces visible throughout the mixture. This step is vital as it sets the foundation for the baking process, ensuring that the loaf will rise properly and bake evenly.
Step 6: Pour into Pan
Now that your batter is thoroughly mixed, it’s time to transfer it into the prepared loaf pan. Ensure that the pan has been greased or lined with parchment paper to prevent sticking, which will make it easier to remove the loaf once baked. Carefully pour the batter into the center of the pan, allowing it to spread out naturally toward the edges. You can use a spatula to help guide the batter, but be gentle to avoid deflating it.
Once the batter is in the pan, use a spatula to smooth the top, creating an even surface. This not only gives your loaf a polished look but also helps it bake evenly. Take your time with this step to ensure that the top is level, as any unevenness can lead to an uneven rise during baking. A well-prepared loaf pan with a smooth batter surface will contribute to a beautiful, uniform loaf once it is baked.
Step 7: Bake
Place the loaf pan in the preheated oven, setting the timer for 1¼–1½ hours. Baking times can vary based on your oven and the specific ingredients used, so it’s essential to keep an eye on the loaf as it bakes. As the loaf cooks, the aroma will fill your kitchen, signaling that it is nearing completion. To check for doneness, insert a toothpick into the center of the loaf; it should come out clean or with just a few moist crumbs attached, indicating that the loaf is fully baked. If you notice that the top of the loaf is browning too quickly, it’s advisable to loosely cover it with aluminum foil during the last 20–30 minutes of baking to prevent it from burning while allowing the inside to cook through.
After the designated baking time, carefully remove the loaf from the oven and let it cool in the pan for a few minutes. This cooling period helps the loaf set and makes it easier to remove from the pan without breaking. Once it has cooled slightly, you can transfer it to a wire rack to cool completely. This final step is crucial as it allows the steam to escape, ensuring that the loaf maintains its texture and does not become soggy.
Step 8: Cool and Slice
Let the cake cool in the pan for 15–20 minutes to set properly, making it easier to remove without breaking. This step ensures the cake reaches the perfect texture and prevents a gummy interior.
After initial cooling, remove the cake from the pan and place it on a wire rack to cool completely. Run a knife around the edges if needed, and gently tap the pan to release the cake. Cooling on a wire rack prevents sogginess and ensures even cooling. Let it cool for at least 30 minutes more, until room temperature.
Once cooled, slice and serve the cake. Enjoy it plain or with vegan butter, vegan cream, or an orange glaze for added flavor. Use a serrated knife for clean cuts. Whether for a gathering or a personal treat, a presentation enhances enjoyment.
7 . Christmas Plum Pudding
Serves:8
Prep Time:30 minutes
Soaking Time: Overnight (8–12 hours)
Cook Time:4–5 hours (steaming)
Total Time: Approximately 5 hours, plus soaking time

Ingredients
2 cups mixed dried fruit (raisins, currants, sultanas, chopped dates)
½ cup suet (beef, vegetarian, or plant-based)
½ cup fresh breadcrumbs
2 large eggs
¼ cup molasses
¼ cup brandy (plus extra for flaming, optional)
Step-by-Step Instructions
Step 1: Soak the Fruit
Begin by selecting a variety of dried fruits that you enjoy, such as raisins, currants, apricots, or cranberries. Place the dried fruit in a large bowl, ensuring there is enough room for the fruit to expand as it absorbs the liquid.
Next, cover the fruit completely with warm water or, for a richer flavor profile, a splash of brandy can be added. The choice of liquid will affect the final taste of the pudding, so consider using fruit juice or even tea as alternatives for a unique twist.
Allow the fruit to soak overnight, or for a minimum of 6–8 hours. This soaking process is crucial as it helps to plump the fruit, making it juicier and more flavorful. The longer the fruit soaks, the more moisture it will absorb, enhancing the overall texture and taste of the pudding.
Step 2: Prepare Pudding Mixture
In a large mixing bowl, combine the soaked fruit (making sure to drain it if it has absorbed excess liquid) with the other essential ingredients. This includes:
Suet, which adds a rich, savory flavor and moisture to the pudding. If you prefer a vegetarian option, you can substitute suet with grated vegetable shortening or coconut oil.
Breadcrumbs, which serve as a binding agent and provide structure to the pudding. You can use fresh or stale breadcrumbs, and for added flavor, consider using whole wheat or spiced breadcrumbs.
In a separate bowl, lightly beat the eggs until they are frothy. This aeration will help give the pudding a light texture. Stir in molasses, which adds depth and a hint of sweetness, along with brandy for a warm, aromatic finish. If you want a non-alcoholic version, you can replace the brandy with apple juice or a non-alcoholic extract.
Once the wet mixture is ready, carefully add it to the bowl containing the dry ingredients. Mix everything until evenly combined, ensuring that the fruit, suet, and breadcrumbs are fully integrated with the egg mixture. The consistency should be thick but pourable; if it seems too dry, a splash of milk or additional liquid can be added to achieve the desired texture.
Step 3: Prepare Pudding Basin
Grease a pudding basin or heatproof bowl generously with butter or oil. This step is crucial as it prevents the pudding from sticking to the sides of the basin during the cooking process. Use a pastry brush or your fingers to ensure that every surface is coated evenly, paying particular attention to the corners and the bottom. The grease will create a non-stick barrier, allowing for a smooth release of the pudding once it’s cooked.
Spoon the pudding mixture into the prepared basin, pressing down lightly to eliminate any air pockets. This ensures that the pudding has a dense and uniform texture. Take care to fill the basin to just below the rim, as the pudding will expand during cooking. Use a spatula to smooth the top of the mixture, creating an even surface that will help with even cooking and presentation once the pudding is turned out.
Cover tightly with greaseproof paper and aluminum foil, securing with string if needed. Start by laying a piece of greaseproof paper over the top of the basin, ensuring it is large enough to cover the entire surface and extend down the sides. Then, place a sheet of aluminum foil over the greaseproof paper, shiny side facing in, to help reflect heat into the pudding. Secure both layers tightly with a kitchen string, tying it around the rim of the basin. This double-layered covering is essential for trapping steam and moisture, which contributes to the pudding's rich and moist texture during the steaming process.
Step 4: Steam the Pudding
Place the pudding basin in a large saucepan with a rack or trivet, filling the water halfway up the basin. The rack or trivet serves to elevate the pudding basin above the water level, preventing direct contact with the boiling water, which could result in uneven cooking or a burnt bottom. Ensure that the water is at a steady level, as this will help maintain a consistent temperature throughout the steaming process.
Bring water to a gentle simmer. It’s important to avoid a rolling boil, as this could create too much turbulence in the water, leading to an uneven cooking environment for the pudding. Instead, aim for small bubbles rising gently to the surface. This simmering action will create a consistent steam environment, allowing the pudding to cook slowly and evenly, which is key to achieving the desired texture and flavor.
Steam for 4–5 hours, checking periodically and topping up water to prevent boiling dry. During this time, the pudding will absorb steam, allowing it to rise and develop its flavors. It’s advisable to check the water level every hour or so, adding more hot water as necessary to maintain the halfway mark. This ensures that the steaming process continues uninterrupted, contributing to a beautifully cooked pudding. After the steaming time is complete, carefully remove the basin from the saucepan, allowing it to cool slightly before attempting to turn it out.
Step 5: Cool and Store
Remove the pudding carefully from the steamer, ensuring that you handle it with caution to avoid any burns from the hot steam. Use a pair of tongs or a spatula to gently lift the pudding out of the steamer basket. It's important to allow the pudding to rest for a moment, as this will help it to settle and maintain its shape.
Once removed, let the pudding cool to room temperature while still covered. This will help retain moisture and prevent the formation of a crust on the surface. Cover it with a clean kitchen towel or plastic wrap to trap the steam and keep the pudding moist. Allowing it to cool slowly is essential, as rapid cooling can lead to a change in texture and may cause the pudding to become dense.
After the pudding has cooled completely, store it in a cool, dry place. It can be kept in an airtight container or wrapped tightly in plastic wrap to prevent it from drying out. The pudding can last for several days or even weeks, depending on the ingredients used. Interestingly, as it sits, the flavors will meld and deepen, enhancing the overall taste experience when you decide to serve it later.
Step 6: Reheat and Serve
To serve, re-steam the pudding for 30–40 minutes until it is heated through. This gentle reheating method helps to restore the pudding's original texture and ensure that it is warm all the way through. Make sure to check the water level in the steamer, adding more if necessary to prevent it from running dry during the reheating process.
For an added touch of elegance and excitement, consider warming some brandy in a small saucepan. Once heated, carefully pour the brandy over the pudding and ignite it for a festive flambé. This dramatic presentation not only enhances the visual appeal but also adds a rich, caramelized flavor to the pudding as the alcohol burns off, leaving behind a delightful essence.
When it comes to serving, consider pairing the pudding with custard, cream, or even vegan alternatives to cater to different dietary preferences. A rich, velvety custard can complement the pudding's texture beautifully, while a dollop of whipped cream adds a light, airy contrast. For those seeking plant-based options, coconut cream or almond milk-based custards can provide a delicious and satisfying alternative. Present your pudding with these accompaniments on the side, allowing guests to customize their servings according to their taste.
8 . Gingerbread Cookies
Serves:24 cookies
Prep Time:25 minutes
Chilling Time:1 hour
Cook Time:10 minutes per batch
Total Time: Approximately 1 hour 35 minutes

Ingredients
3 cups all-purpose flour
¾ cup butter, softened
¾ cup brown sugar
½ cup molasses
1 egg
1 tsp ginger
1 tsp cinnamon
¼ tsp cloves
½ tsp baking soda
Step-by-Step Instructions
Mix Dry Ingredients. In a large mixing bowl, begin by carefully measuring out the flour. It is important to use a spoon to scoop the flour into the measuring cup and then level it off with a knife to avoid packing it down, which can lead to using too much flour. Next, add in the spices, which may include cinnamon, ginger, and nutmeg, depending on your recipe. These spices will add warmth and depth to the flavor profile. Finally, sprinkle in the baking soda, which is essential for leavening the cookies. Using a whisk, thoroughly combine these dry ingredients until they are evenly mixed, ensuring that the spices and baking soda are distributed throughout the flour. This step is crucial as it prevents clumping and ensures a uniform taste in your final product.
Cream Butter & Sugar. In a separate mixing bowl, take the softened butter, which should be at room temperature for best results, and add the granulated sugar. Using an electric mixer, beat the two ingredients together on medium speed. Continue mixing until the mixture becomes light and fluffy, which usually takes about 3 to 5 minutes. This process incorporates air into the mixture, resulting in a lighter cookie texture. Make sure to scrape down the sides of the bowl occasionally to ensure that all the butter and sugar are well combined. The color should turn pale, indicating that the mixture is well-aerated.
Add Wet Ingredients Once the butter and sugar are creamed to perfection, it’s time to introduce the wet ingredients. Add the molasses, which not only provides sweetness but also contributes a rich, deep flavor and a darker color to the dough. Crack the egg into the bowl, ensuring no shell fragments make their way into the mixture. Using the electric mixer again, blend these ingredients on low speed until the mixture is smooth and homogenous. This step is important as it ensures that the molasses and egg are fully integrated, creating a cohesive mixture that will bind the dry ingredients together effectively.
Combine Dough. With your wet ingredients now ready, it’s time to bring everything together. Gradually add the bowl of dry ingredients to the wet mixture. It’s best to do this in increments, mixing on low speed to avoid a flour explosion in your kitchen. Once all the dry ingredients have been added, continue mixing until a dough forms. The dough should be slightly sticky but manageable. If it seems too dry, you can add a teaspoon of water or milk to help it come together. Once combined, stop mixing to avoid overworking the dough, which can lead to tougher cookies.
Chill Dough. After forming the dough, it’s essential to chill it for a smoother rolling experience. Take the dough out of the mixing bowl and shape it into a disc. Wrap it tightly in plastic wrap or place it in an airtight container. Refrigerate the dough for at least 1 hour. Chilling not only helps to firm up the dough, making it easier to roll out, but it also enhances the flavors as they meld together. If you’re short on time, a minimum of 30 minutes can suffice, but longer is always better for optimal flavor.
Roll & Cut Once the dough has chilled, remove it from the refrigerator and let it sit for a few minutes to soften slightly, making it easier to work with. On a lightly floured surface, use a rolling pin to roll out the dough to about 1/4 inch thick. Make sure to dust the surface and the rolling pin with flour to prevent sticking. Using cookie cutters of your choice, cut out shapes from the rolled dough. Carefully transfer the cut shapes to a baking sheet lined with parchment paper, leaving space between each cookie to allow for spreading while baking. If desired, you can re-roll the scraps of dough to cut out additional shapes.
Bake: Preheat your oven to 350°F (175°C) before placing your cookies in. This ensures they bake evenly. Once the oven is ready, place the baking sheet with the cut-out cookies into the oven and bake for approximately 10 minutes. Keep an eye on them as baking times may vary slightly depending on your oven and the thickness of the cookies. The edges should be lightly golden, while the centers may look slightly soft. This is normal as they will continue to firm up as they cool.
Cool. After baking, carefully remove the cookies from the oven and allow them to sit on the baking sheet for a few minutes to set. Then, transfer them to a wire rack to cool completely. This cooling process is crucial as it allows the cookies to firm up and makes them easier to decorate. Once cooled, they can be adorned with icing, sprinkles, or any other decorations of your choice, transforming them into a festive treat. Enjoy your delicious homemade cookies!
9 . Christmas Fruitcake
Serves:12–16 slices
Prep Time:30 minutes
Soaking Time: Overnight (8–12 hours)
Cook Time:2½–3 hours (slow baking)
Total Time:Approximately 3½ hours, plus soaking & aging time
Ingredients
2½ cups mixed dried fruit
1 cup butter
1 cup sugar
4 eggs
2 cups flour
1 tsp mixed spice
Step-by-Step Instructions
Soak Fruit. Begin by selecting a variety of dried fruits such as raisins, currants, apricots, or cranberries. Place the dried fruit in a bowl and cover it with either juice, such as orange or apple juice, or a splash of brandy for a richer flavor. Ensure that the fruit is fully submerged in the liquid to allow for even soaking. Let the mixture sit overnight, or for at least 8 hours, to allow the fruit to absorb the liquid, which will enhance its flavor and texture, making it plump and juicy when incorporated into your recipe.
Cream Butter & Sugar. In a large mixing bowl, take softened butter and granulated sugar. Using an electric mixer or a wooden spoon, beat the mixture together until it becomes light in color and fluffy in texture. This process typically takes about 3 to 5 minutes. The goal is to incorporate air into the butter, which will help create a light and tender final product. Scrape down the sides of the bowl occasionally to ensure that all the butter and sugar are well combined, maximizing the fluffiness of the mixture.
Add Eggs. Next, crack the eggs into a separate bowl to avoid any shell fragments. Add the eggs to the creamed butter and sugar mixture one at a time, mixing well after each addition. This gradual incorporation helps maintain the emulsion and ensures that the mixture remains smooth. Continue to beat until the eggs are fully integrated and the mixture is homogeneous, which will contribute to the overall structure and moisture of the final baked good.
Fold Dry Ingredients. In a separate bowl, combine your dry ingredients, which typically include flour, baking powder, and a selection of spices such as cinnamon, nutmeg, or ginger, depending on your flavor preference. Gently sift the dry ingredients together to aerate them and remove any lumps. Then, using a spatula, carefully fold the dry mixture into the wet ingredients. This technique requires a gentle hand to avoid overmixing, which can lead to a dense texture. The aim is to combine the ingredients just until no dry flour is visible, creating a batter that is still light and airy.
Add Fruit. Once the dry ingredients are fully incorporated, it's time to add the soaked fruit. Drain the fruit from the soaking liquid if necessary, and gently stir it into the batter using a spatula. Ensure that the fruit is evenly distributed throughout the mixture, but be cautious not to overmix, as this could break down the fruit and affect the texture of the batter. The addition of the soaked fruit not only adds flavor but also introduces moisture and a delightful chewiness to the final product.
Bake. Preheat your oven to a temperature of 300°F (150°C). Prepare your baking pan by greasing it lightly or lining it with parchment paper to prevent sticking. Pour the batter into the prepared pan, smoothing the top with a spatula. Place the pan in the preheated oven and bake for approximately 2½ hours. It's essential to monitor the baking process; if the top begins to brown too quickly, you can cover it loosely with aluminum foil. The cake is done when a toothpick inserted into the center comes out clean or with a few moist crumbs attached, indicating that it is perfectly baked.
Cool completely. Once baked, remove the pan from the oven and allow it to cool in the pan for about 15 to 20 minutes. After this initial cooling period, carefully transfer the cake to a wire rack to cool completely. This step is crucial, as it allows air to circulate through the cake, preventing sogginess. Once the cake has cooled completely, it can be sliced into portions. Enjoy the delightful flavors and textures that have developed during the baking process, and consider serving it with a dollop of whipped cream or a sprinkle of powdered sugar for an added touch.
10 . Yule Log Cake (Bûche de Noël)
Serves:8–10
Prep Time:40 minutes
Cooling Time:30 minutes
Cook Time:12–15 minutes
Total Time: Approximately 1 hour 30 minutes

Ingredients
Chocolate sponge cake
Whipped cream filling
Chocolate ganache
Step-by-Step Instructions
Bake Sponge. To begin the process of creating a delicious rolled sponge cake, start by preparing your batter. Carefully spread the batter thinly and evenly in a lined baking pan, ensuring that there are no thick spots that could lead to uneven baking. Preheat your oven to the appropriate temperature, typically around 350°F (175°C), and place the pan in the oven. Bake the sponge until it is just set, which usually takes about 10 to 15 minutes. You’ll know it’s ready when the edges slightly pull away from the sides of the pan, and a toothpick inserted in the center comes out clean. This step is crucial, as an overbaked sponge can become dry and difficult to roll.
Roll While Warm. Once your sponge is out of the oven, let it cool for just a minute or two, but do not allow it to cool completely. While it is still warm, carefully roll the sponge cake with the parchment paper still attached, starting from one end and rolling tightly but gently to maintain its shape. This technique helps to set the sponge into a rolled form, which will make it easier to fill later. After rolling, place the rolled sponge on a wire rack to cool completely. Cooling it in this rolled state will help to prevent cracking when you unroll it later for filling.
Fill. Once your sponge has cooled down sufficiently, it’s time to unroll it gently. Carefully peel back the parchment paper without tearing the sponge. With the sponge flat on your work surface, take your prepared whipped cream—light and fluffy—and spread it evenly across the surface of the sponge. Make sure to cover the entire area, reaching all the edges, to ensure that each bite will be deliciously creamy. For added flavor, consider folding in some vanilla extract or a hint of cocoa powder into the whipped cream before spreading. This step not only adds taste but also enhances the overall aesthetic of your dessert.
Re-Roll. After you have evenly spread the whipped cream, it’s time to roll the sponge back up into its log shape. Start at one end and carefully lift the sponge, rolling it tightly but without applying too much pressure that might cause it to crack. As you roll, keep the filling intact and distribute it evenly throughout the roll. Once you have formed the log, place it seam side down on your serving platter. This will help to keep the roll intact and maintain its shape as you prepare to frost it.
Frost. Now that your sponge cake is rolled and resting, it’s time to prepare the chocolate ganache for frosting. To make the ganache, heat heavy cream until it just begins to simmer and then pour it over chopped chocolate. Allow it to sit for a few minutes before stirring until smooth and glossy. Once your ganache is ready, pour it over the rolled sponge, using a spatula to spread it evenly across the top and sides. The rich chocolate ganache will not only add a decadent flavor but also provide a beautiful finish to your dessert.
Decorate. Finally, it’s time to add the finishing touches to your chocolate-covered sponge cake. To create a rustic bark texture, you can use a spatula or a fork to gently score the surface of the ganache, giving it an appealing visual effect reminiscent of tree bark. For an extra touch of elegance, dust the top with powdered sugar or scatter fresh berries around the base of the log. These decorative elements will not only enhance the presentation of your dessert but also add contrasting flavors and textures, making your rolled sponge cake a true showstopper. Serve chilled and enjoy the delightful combination of flavors and textures!
11 . Eggnog (Traditional Holiday Drink)
Serves:6
Prep Time:15 minutes
Chilling Time:2 hours
Cook Time:10 minutes (custard base)
Total Time: Approximately 2 hours 25 minutes

Ingredients
2 cups milk
1 cup heavy cream
4 egg yolks
½ cup sugar
Nutmeg, to garnish
Step-by-Step Instructions
Whisk Yolks & Sugar. Begin by cracking fresh eggs and separating the yolks from the whites with care, ensuring that no traces of egg whites contaminate the yolks. In a large mixing bowl, combine the yolks with granulated sugar. Using a whisk, vigorously whisk the mixture together until it transforms into a pale yellow color and achieves a thick, creamy consistency. This process not only incorporates air into the mixture, which helps to create a light texture, but it also dissolves the sugar, ensuring a smooth final product.
Heat Milk & Cream. In a medium saucepan, combine equal parts of whole milk and heavy cream, which will add richness to your mixture. Place the saucepan over low to medium heat, allowing the dairy to warm gently. Stir occasionally to prevent the milk from scorching on the bottom. Keep a close eye on the mixture until it begins to steam and small bubbles form around the edges, indicating that it is hot but not boiling. It is crucial to avoid boiling as this can cause the dairy to curdle, which would ruin the smooth texture you are aiming for.
Temper Eggs. To prevent the yolks from scrambling, it is essential to temper them. Slowly begin to pour the hot milk and cream mixture into the egg yolk and sugar mixture while continuously whisking. This gradual incorporation of heat will gently raise the temperature of the eggs without cooking them. Continue whisking until you have added about half of the hot liquid to the egg mixture, ensuring that it is well combined and smooth. Once tempered, pour the entire egg mixture back into the saucepan with the remaining milk and cream, whisking constantly to maintain a uniform consistency.
Cook Gently. Return the saucepan to the stove over low heat. Stir the mixture continuously with a wooden spoon or a heat-resistant spatula, scraping the bottom of the pan to prevent sticking and burning. Monitor the mixture closely as it thickens, which usually takes about 5 to 10 minutes. You will know it is ready when it coats the back of the spoon and leaves a clear trail when you run your finger through it. This step is crucial as it develops the flavors and achieves the desired custard-like texture.
Chill. Once the mixture has thickened to your satisfaction, remove it from the heat and allow it to cool slightly at room temperature. Afterward, transfer the custard to a clean bowl or container and cover it with plastic wrap, pressing the wrap directly onto the surface to prevent a skin from forming. Place the covered mixture in the refrigerator and allow it to chill for a minimum of 2 hours. This chilling process not only enhances the flavors but also allows the custard to set to a perfect consistency.
Serve. After the custard has thoroughly chilled, it is ready to be served. Spoon the creamy custard into individual serving dishes or bowls. For an elegant touch, sprinkle freshly grated nutmeg on top just before serving. This not only adds a delightful aromatic flavor but also enhances the visual appeal of the dish. Enjoy your delicious homemade custard as a standalone dessert or as a delightful accompaniment to cakes, pastries, or fresh fruits.
12 . Chocolate-Strawberry Pretzel Cookies
Serves:18–20 cookies
Prep Time:25 minutes
Chill Time:30 minutes
Bake Time:10–12 minutes
Total Time: About 1 hour 10 minutes

Ingredients
Cookie Dough
1½ cups all-purpose flour
½ cup unsalted butter, softened
¾ cup brown sugar
1 large egg
1 tsp vanilla extract
½ tsp baking soda
¼ tsp salt
Mix-Ins
¾ cup crushed pretzels
½ cup semi-sweet chocolate chips
½ cup dried strawberries (chopped)
Optional Topping
Melted chocolate drizzle
Crushed pretzels or freeze-dried strawberry powder
Step-by-Step Instructions
Step 1: Prepare Dry Ingredients
In a medium-sized mixing bowl, begin by carefully measuring out the necessary quantities of all-purpose flour, baking soda, and salt. Using a whisk, combine these dry ingredients thoroughly to ensure an even distribution of the leavening agent and salt throughout the flour. This step is crucial because it helps to prevent clumps of baking soda or salt from forming in your final mixture. Once you have achieved a uniform blend, set the bowl aside in a cool, dry place, allowing the mixture to rest while you move on to the next steps of your recipe.
Step 2: Cream Butter & Sugar
In a large mixing bowl, take your room-temperature butter and brown sugar and combine them using an electric mixer or a sturdy wooden spoon. Beat the mixture on medium speed until it becomes light and fluffy, which should take approximately 2 to 3 minutes. This process is essential as it incorporates air into the butter, which will help your final product achieve a desirable texture. Ensure that you scrape down the sides of the bowl periodically to guarantee that all the butter and sugar are evenly mixed. The mixture should appear pale in color and have a creamy consistency, indicating that it is perfectly creamed and ready for the next ingredient.
Step 3: Add Wet Ingredients
Once your butter and sugar mixture is light and airy, it is time to introduce the egg and vanilla extract. Crack the egg into a small bowl first to check for any shell fragments, then add it to the creamed mixture. Pour in the vanilla extract, which not only enhances the flavor but also adds a wonderful aroma to your batter. Using your mixer on low speed, blend these wet ingredients into the creamed butter and sugar until everything is fully incorporated. Take care to mix just until combined; overmixing at this stage can lead to a denser final product. The mixture should now be smooth and glossy, with no visible traces of the egg or vanilla extract remaining, indicating that you are ready to proceed to the next steps of your baking process.
Step 4: Combine Dough
In this crucial step of the baking process, you will begin to see the transformation of your ingredients into a cohesive dough. Start by taking your prepared wet mixture, which typically consists of ingredients such as eggs, butter, and any liquids used in the recipe, and place it in a large mixing bowl. Gradually introduce the dry ingredients, which may include flour, baking powder, sugar, and salt, to the wet mixture. It is essential to add the dry ingredients slowly, perhaps in increments, to prevent clumping and to ensure that the mixture integrates smoothly. As you combine the two mixtures, use a spatula or a wooden spoon to gently fold the ingredients together. Be careful not to overmix, as this can lead to a tough dough rather than the desired soft and tender texture. Keep mixing just until you can see that the dry ingredients are fully incorporated, and a soft, pliable dough begins to form. This dough should be slightly sticky but manageable, indicating that you are on the right track to creating a delicious baked good.
Step 5: Fold in Mix-Ins
Once your dough has reached the desired consistency, it’s time to enhance its flavor and texture by incorporating a variety of delightful mix-ins. In this step, you will gently fold in crushed pretzels, chocolate chips, and dried strawberries. Begin by measuring out the pretzels, ensuring they are crushed into small pieces that will blend well without overpowering the dough. The salty crunch of the pretzels will provide a wonderful contrast to the sweetness of the chocolate chips and the fruity notes of the dried strawberries. Next, carefully add the chocolate chips, which will melt slightly during baking, creating pockets of gooey chocolate goodness throughout your final product. Finally, include the dried strawberries, which should be chopped into smaller bits if they are large, to ensure even distribution and to prevent any clumping. Using a spatula, gently fold these mix-ins into the dough, taking care to distribute them evenly without overworking the dough. This step is essential, as it not only enhances the flavor profile of your baked item but also adds visual appeal, making each bite a delightful surprise. The combination of salty, sweet, and fruity elements will create a complex and satisfying taste experience.
Step 6: Chill Dough
Once you have prepared your cookie dough, it is essential to cover it and place it in the refrigerator to chill for a duration of 30 minutes. This chilling process is crucial as it allows the fats within the dough, such as butter, to solidify slightly, which helps the cookies maintain their shape during baking. If the dough is not chilled, the cookies may spread too much in the oven, resulting in flat, misshapen cookies rather than the desired thick and chewy texture. Additionally, chilling the dough can enhance the flavors as the ingredients have more time to meld together. To ensure optimal results, wrap the dough tightly in plastic wrap or place it in an airtight container to prevent it from absorbing any odors from the refrigerator. This step not only improves the structural integrity of the cookies but also contributes to a richer taste.
Step 7: Preheat Oven
While the dough is chilling, it is the perfect time to prepare your baking environment. Preheat your oven to a temperature of 350°F (175°C). This temperature is ideal for baking cookies, as it allows them to cook evenly and develop a beautiful golden-brown color while maintaining a soft interior. Preheating is a critical step; starting with a hot oven ensures that the cookies begin to bake immediately upon entering, which helps them rise properly and achieve the perfect texture. In addition to preheating the oven, take the time to line your baking sheets with parchment paper. This not only prevents the cookies from sticking but also promotes even baking and makes for easier cleanup afterward. If you do not have parchment paper, lightly greasing the baking sheets with butter or cooking spray can be an alternative, though parchment paper is generally preferred for its non-stick properties.
Step 8: Shape Cookies
After the dough has chilled and your oven is preheated, it's time to shape your cookies. Using a cookie scoop or a tablespoon, measure out portions of dough, approximately the size of a tablespoon, and roll each portion into a smooth ball using your hands. This step is important as it helps ensure that the cookies bake evenly. Once you have shaped the dough into balls, place them on the prepared baking sheets, making sure to leave at least 2 inches of space between each ball. This spacing is necessary to allow for the cookies to spread as they bake, preventing them from merging into one another. Depending on the size of your baking sheets, you may need to bake the cookies in batches. If desired, you can also gently flatten the cookie balls slightly with the palm of your hand or the bottom of a glass to create a more uniform shape, although this is optional. The anticipation of the cookies baking and the delightful aroma that will soon fill the kitchen makes this step particularly exciting.
Step 9: Bake
Once you have prepared your cookie dough and shaped it into individual portions, it is time to bake them to perfection. Preheat your oven to the appropriate temperature, usually around 350°F (175°C), ensuring that it is fully heated before placing your cookies inside. Carefully arrange the cookie dough balls on a baking sheet lined with parchment paper, spacing them adequately apart to allow for spreading during the baking process. Bake for 10–12 minutes, keeping a close eye on them as they cook. The goal is to achieve edges that are lightly golden brown while ensuring that the centers of the cookies remain soft and chewy. This contrast in texture is what makes freshly baked cookies so delightful. When the baking time is nearly complete, you may want to rotate the baking sheet halfway through to ensure even baking, especially if your oven has hot spots. Once they are done, remove the cookies from the oven and allow the tantalizing aroma to fill your kitchen, signaling that a delicious treat is on the way.
Step 10: Cool
After taking the cookies out of the oven, it is crucial to let them cool for a brief period on the baking sheet. Allow them to rest for about 5 minutes; this resting time is essential as it allows the cookies to set, making them easier to transfer without falling apart. During this time, the residual heat from the baking sheet will continue to cook the bottoms of the cookies slightly, enhancing their texture. After the initial cooling period, gently lift each cookie with a spatula and transfer it to a wire rack. Placing them on a wire rack is important because it allows air to circulate around the cookies, preventing them from becoming soggy on the bottom. Let them cool completely on the rack, which will help maintain their delightful softness and ensure they are ready for any decoration or serving.
Step 11: Decorate (Optional)
Once your cookies have cooled and are ready for the finishing touch, you can get creative with decorations to elevate their appearance and flavor. One delightful option is to drizzle the cooled cookies with melted chocolate. To do this, simply melt your choice of chocolate—dark, milk, or white—until it reaches a smooth consistency. Using a fork or a piping bag, create beautiful drizzles over the cookies, allowing the chocolate to set slightly as it cools. For an added crunch and a burst of flavor, consider sprinkling the drizzled cookies with crushed pretzels, which provide a salty contrast to the sweetness of the chocolate. Alternatively, you might opt for a sprinkle of strawberry powder for a fruity twist that adds both color and a hint of tartness. These optional decorations not only enhance the visual appeal of your cookies but also introduce new flavors and textures, making each bite a delightful experience. Whether you choose to decorate or keep them simple, these cookies are sure to impress!


Comments