
“Christmas Cheer on the Table: Timeless Dishes for Holiday Celebrations”
- SABA

- Jan 2
- 35 min read
1 . Puff Pastry Christmas Palmiers
Serves:10–12 slices
Prep Time:30 minutes
Cook Time:1 hour 10 minutes
Cooling & Chilling Time:4 hours (minimum)
Total Time: About 5½ hours

Ingredients
Crust
1½ cups graham cracker crumbs
¼ cup brown sugar
½ cup unsalted butter, melted
Apple Filling
3 medium apples, peeled & diced
2 tbsp butter
¼ cup brown sugar
1 tsp cinnamon
¼ tsp nutmeg
Cheesecake Filling
24 oz (680 g) cream cheese, softened
¾ cup granulated sugar
3 large eggs
1 cup sour cream
1 tsp vanilla extract
Caramel Topping
½ cup caramel sauce (homemade or store-bought)
Step-by-Step Instructions
Step 1: Preheat Oven
Begin by preheating your oven to a temperature of 325°F (165°C). This temperature is crucial for achieving the perfect baking environment for your cheesecake, allowing it to cook evenly and develop a creamy texture. While the oven is warming up, take a 9-inch springform pan and generously grease it with butter or non-stick cooking spray to ensure that the cheesecake can be easily removed once it’s fully baked. To prevent any water from seeping into the pan during the water bath process, wrap the outside of the springform pan securely with aluminum foil, making sure to cover it completely. This step is essential as it helps maintain a stable temperature and prevents the cheesecake from cracking.
Step 2: Make the Crust
In a medium-sized mixing bowl, combine graham cracker crumbs, brown sugar, and melted butter. Use a fork or a spatula to mix these ingredients thoroughly until they form a sandy texture that resembles wet sand. This mixture will serve as the base of your cheesecake, providing a deliciously sweet and slightly crunchy contrast to the creamy filling. Once the ingredients are well combined, transfer the mixture to the prepared springform pan. Press it firmly and evenly into the bottom of the pan using the back of a measuring cup or your fingers, ensuring that it is compact and reaches the edges. This will create a sturdy crust that holds its shape after baking. Bake the crust in the preheated oven for 10 minutes to set it, then remove it and allow it to cool slightly while you prepare the filling.
Step 3: Prepare the Apple Filling
To create the flavorful apple filling, start by melting a generous amount of butter in a skillet over medium heat. Once the butter is bubbling, add the sliced apples, followed by brown sugar, cinnamon, and nutmeg. Stir the mixture well to ensure that the apples are evenly coated with the sweet and aromatic spices. Cook the apples for approximately 5–7 minutes, stirring occasionally, until they become tender and slightly caramelized. The heat will enhance their natural sweetness and create a delightful aroma in your kitchen. Once the apples are softened and fragrant, remove the skillet from the heat and set the filling aside to cool, allowing the flavors to meld together before incorporating it into the cheesecake.
Step 4: Make Cheesecake Filling
In a large mixing bowl, begin by beating the cream cheese with an electric mixer on medium speed until it reaches a smooth and creamy consistency. This step is crucial as it helps to eliminate any lumps, ensuring a velvety texture for your cheesecake. Gradually add in the sugar, continuing to beat the mixture until it becomes light and fluffy. This process typically takes a few minutes and is essential for achieving the right sweetness without graininess. Next, incorporate the eggs one at a time, mixing well after each addition. This method helps to maintain the structure of the cheesecake and prevents overmixing, which can lead to cracks. After the eggs are fully integrated, gently fold in the sour cream and vanilla extract using a spatula, ensuring that these ingredients are combined without deflating the mixture. The addition of sour cream will enhance the creaminess and tanginess of the cheesecake, resulting in a rich and decadent dessert.
Step 5: Assemble Cheesecake
To begin the assembly of your cheesecake, carefully pour half of the prepared cheesecake batter over the pre-baked crust, ensuring it spreads evenly across the surface. This initial layer forms a rich and creamy foundation for the flavors to come. Next, take the apple mixture that has been prepared earlier, which should include a delightful blend of spices and sweetness, and spoon half of it evenly over the cheesecake batter. The goal is to distribute the apple mixture uniformly so that each slice of cheesecake will have a perfect balance of apple and creaminess. After layering the apples, gently pour the remaining cheesecake batter on top, smoothing it out with a spatula to create an even surface. Finally, finish off the assembly by adding the rest of the apple mixture on top of the second layer of batter, ensuring that the apples are well-distributed and visible, creating a beautiful presentation for the cheesecake.
Step 6: Bake in Water Bath
For the baking process, it is crucial to create a water bath, which helps regulate the temperature and moisture level during baking, resulting in a smooth and creamy texture without cracks. To do this, place the assembled cheesecake pan into a larger roasting dish. Carefully pour hot water into the roasting dish until it reaches about halfway up the sides of the cheesecake pan. This method of gentle baking is essential for achieving the perfect consistency. Set your oven to the appropriate temperature and bake the cheesecake for 60–70 minutes. Keep a close eye on the edges; they should be set and firm, while the center of the cheesecake should jiggle slightly when you gently shake the pan. This slight jiggle indicates that it will firm up as it cools, ensuring a delightful texture.
Step 7: Cool Gradually
Once the baking time is complete, it is important to allow the cheesecake to cool gradually to prevent it from cracking. Turn off the oven and crack the door open slightly, allowing the heat to escape while still keeping the cheesecake warm inside. Let the cheesecake cool in this environment for a full 1 hour. This gradual cooling process helps to stabilize the structure of the cheesecake. After the hour has passed, carefully remove the cheesecake from the oven and place it on a wire rack or a heat-resistant surface to cool completely at room temperature. This step is essential, as cooling too quickly can lead to unsightly cracks on the surface of your cheesecake.
Step 8: Chill
Once the cheesecake has cooled to room temperature, it is time to move it to the refrigerator for chilling. Cover the cheesecake loosely with plastic wrap or aluminum foil, making sure it does not touch the surface to avoid any unwanted imprints. Refrigerate for a minimum of 3 hours, but for best results, consider leaving it overnight. This chilling period allows the flavors to meld beautifully and helps the cheesecake to set completely, resulting in a firmer texture that is easier to slice and serve. The longer it chills, the more the flavors develop, creating a deliciously rich and satisfying dessert.
Step 9: Add Caramel
When you are ready to serve your delicious cheesecake, take it out of the refrigerator and prepare to add the finishing touch that will elevate its flavor profile. Generously drizzle the top of the cheesecake with caramel sauce, allowing it to cascade down the sides for an appealing presentation. The sweet, buttery notes of the caramel complement the creamy cheesecake and tart apples perfectly, creating a harmonious blend of flavors. For an extra touch, consider garnishing with a sprinkle of sea salt or a few apple slices for decoration. This final step not only enhances the visual appeal but also adds a layer of flavor that will delight your guests and make your cheesecake unforgettable.
🎄 Serving & Storage Tips
Serve chilled or slightly softened
Garnish with whipped cream or apple slices
Store in fridge for 3–4 days
2 . Caramel Apple Cheesecake
Serves:10–12 slices
Prep Time:30 minutes
Cook Time:1 hour 10 minutes
Cooling & Chilling Time:4 hours (minimum)
Total Time: About 5½ hours

Ingredients
Crust
1½ cups graham cracker crumbs
¼ cup brown sugar
½ cup unsalted butter, melted
Apple Filling
3 medium apples, peeled & diced
2 tbsp butter
¼ cup brown sugar
1 tsp cinnamon
¼ tsp nutmeg
Cheesecake Filling
24 oz (680 g) cream cheese, softened
¾ cup granulated sugar
3 large eggs
1 cup sour cream
1 tsp vanilla extract
Caramel Topping
½ cup caramel sauce (homemade or store-bought)
Step-by-Step Instructions
Step 1: Preheat Oven
Begin by preheating your oven to a temperature of 325°F (165°C). This temperature is ideal for baking a cheesecake, as it allows for even cooking without the risk of over-browning the top. While the oven is heating, take the time to prepare your baking equipment. Grease a 9-inch springform pan thoroughly with a non-stick cooking spray or a small amount of butter to ensure that the cheesecake can be removed easily after baking. Additionally, to create a water bath that will help maintain moisture during baking, wrap the outside of the springform pan with aluminum foil. Make sure to cover it completely to prevent any water from seeping in, which could affect the texture of your crust and filling.
Step 2: Make the Crust
In a mixing bowl, combine graham cracker crumbs, brown sugar, and melted butter to create a rich and flavorful crust. The graham cracker crumbs provide a delightful crunch, while the brown sugar adds a hint of molasses flavor that elevates the overall taste. Stir the mixture until it is well combined and resembles wet sand. Once mixed, take the crumb mixture and press it firmly into the bottom of the prepared springform pan, ensuring an even layer that will hold together nicely when baked. This step is crucial for achieving a sturdy base for your cheesecake. After pressing the crumbs down, place the pan in the preheated oven and bake for 10 minutes. This initial baking will help to set the crust and enhance its flavor. Once the time is up, remove the pan from the oven and allow it to cool slightly before adding the filling.
Step 3: Prepare the Apple Filling
To create the delicious apple filling that will complement your cheesecake, start by melting butter in a skillet over medium heat. The butter will serve as a base for the filling, adding richness and depth to the flavor. Once the butter has melted, add the sliced apples to the skillet. It’s best to use a mix of sweet and tart apples, such as Granny Smith and Honeycrisp, for a balanced flavor profile. Sprinkle in the brown sugar, which will caramelize as the apples cook, along with a generous dash of cinnamon and nutmeg for warmth and spice. These spices not only enhance the flavor but also evoke a comforting, homey aroma in your kitchen. Cook the mixture for 5–7 minutes, stirring occasionally, until the apples have softened and are slightly translucent but still hold their shape. Once cooked, remove the skillet from the heat and set the apple filling aside to cool. This cooling step is essential, as adding hot filling to your cheesecake batter can alter the texture and consistency.
Step 4: Make Cheesecake Filling
Begin by taking your cream cheese out of the refrigerator and allowing it to come to room temperature. This step is crucial as it ensures that the cream cheese will be easier to beat, resulting in a smooth and creamy texture without lumps. Using an electric mixer, beat the cream cheese in a large mixing bowl until it reaches a perfectly smooth consistency, which may take a few minutes. Once the cream cheese is adequately softened and whipped, gradually add in the granulated sugar. Continue to beat the mixture until it becomes creamy and well combined, ensuring that the sugar is fully dissolved into the cream cheese, which will contribute to a luscious filling.
Next, it’s time to incorporate the eggs. It is essential to add the eggs one at a time to maintain the structure of the filling. After each egg is added, beat the mixture until it is fully integrated before adding the next one. This method helps to create a light and airy texture in the cheesecake, preventing it from becoming dense. Once all the eggs are incorporated, gently fold in the sour cream, which adds a delightful tanginess and creaminess to the filling. Finally, add a splash of vanilla extract to enhance the flavor profile of the cheesecake. Mix everything until just combined, being careful not to overmix, as this can introduce excess air into the batter, which may lead to cracks during baking.
Step 5: Assemble Cheesecake
Now that your cheesecake filling is ready, it’s time to assemble your delicious dessert. Start by carefully pouring half of the cheesecake batter over the prepared crust, ensuring that it spreads evenly across the bottom. This layer forms the foundation of your cheesecake and should be level to ensure even baking. After you’ve poured the batter, take your pre-prepared apple mixture, which should consist of cooked apples tossed with sugar and spices, and spoon half of it evenly over the cheesecake batter. This step adds a delightful fruity layer that complements the rich creaminess of the cheesecake.
Once the apple mixture is distributed, gently pour the remaining cheesecake batter on top, ensuring that it covers the apple layer completely. This will encase the apples within the creamy filling, allowing their flavors to meld together during baking. Finally, take the rest of the apple mixture and place it on top of the second layer of batter. You can either spoon it on in dollops or spread it out slightly for a more even distribution. This final layer of apples will not only add visual appeal but will also provide a burst of flavor with every bite. With the cheesecake fully assembled, it is now ready for the next step in the baking process, where it will transform into a delectable dessert that is sure to impress.
Step 6: Bake in Water Bath
To begin the baking process, carefully place your cheesecake pan into a larger roasting dish. This method is essential as it creates a gentle and even heat around the cheesecake, preventing the edges from overcooking while allowing the center to set perfectly. Next, fill the roasting dish with hot water, ensuring that the water level reaches about halfway up the sides of the cheesecake pan. This water bath, or bain-marie, helps to regulate the baking temperature, which is crucial for achieving that smooth and creamy texture characteristic of a well-made cheesecake. Once you have your setup ready, transfer the entire assembly into a preheated oven. Bake the cheesecake for a duration of 60–70 minutes. You will know it is ready when the edges of the cheesecake appear set and firm, while the center still jiggles slightly when you gently shake the pan. This slight jiggle indicates that the cheesecake will firm up as it cools, resulting in the ideal consistency.
Step 7: Cool Gradually
After the baking time is complete, it is important to turn off the oven, but resist the urge to immediately remove the cheesecake. Instead, crack the oven door open just a few inches to allow for a gradual cooling process. This step is crucial as it helps to prevent the cheesecake from cracking due to a sudden temperature change. Allow the cheesecake to cool inside the oven for about 1 hour. During this time, the residual heat will help the cheesecake to continue setting while also allowing it to cool slowly. Once the hour has passed, carefully remove the cheesecake from the oven and let it cool completely at room temperature. This gradual cooling process not only preserves the texture but also enhances the flavor, making your cheesecake even more delightful.
Step 8: Chill
Once the cheesecake has cooled to room temperature, it is time to move on to the chilling stage. Transfer the cheesecake to the refrigerator and allow it to chill for a minimum of 3 hours, although for best results, leaving it overnight is highly recommended. Chilling the cheesecake allows the flavors to meld together beautifully and helps it to firm up to the perfect sliceable consistency. The longer it sits in the fridge, the more the flavors will develop, resulting in a richer and more satisfying dessert experience when you are ready to serve it.
Step 9: Add Caramel
When the time comes to serve your cheesecake, it's time to elevate its presentation and flavor with a delicious drizzle of caramel sauce. Before serving, generously drizzle the caramel sauce over the top of the cheesecake, allowing it to cascade down the sides for a visually appealing finish. The sweet and buttery notes of the caramel will complement the creamy richness of the cheesecake, creating a perfect harmony of flavors. For an added touch, consider garnishing with a sprinkle of sea salt or chopped nuts to enhance the texture and flavor profile. Your beautifully prepared cheesecake is now ready to be enjoyed, and it is sure to impress all your guests with its decadent taste and stunning appearance.
🎄 Serving & Storage Tips
Serve chilled or slightly softened
Garnish with whipped cream or apple slices
Store in fridge for 3–4 days
3 . Caramel Apple Cheesecake
Serves-8–10 slices
Prep Time-25 minutes
Bake Time-12–15 minutes
Cooling & Filling Time-40 minutes

Ingredients
Gingerbread Sponge Cake
3 large eggs, room temperature
¾ cup brown sugar
¼ cup molasses
¾ cup all-purpose flour
1 tsp baking powder
1½ tsp ground ginger
1 tsp ground cinnamon
¼ tsp ground cloves
¼ tsp nutmeg
¼ tsp salt
Cream Cheese Filling
8 oz (225 g) cream cheese, softened
¾ cup powdered sugar
1 tsp vanilla extract
1 cup heavy whipping cream, cold
For Rolling & Decorating
Powdered sugar (for dusting)
Fresh rosemary or sugared cranberries (optional)
Step-by-Step Instructions
Step 1: Prepare the Pan
First, begin by preheating your oven to 350°F (175°C). This temperature is ideal for baking gingerbread, as it allows for even cooking and helps achieve that perfect texture that is both soft and slightly firm.
Next, take a 10×15-inch (25×38 cm) jelly roll pan, which is specifically designed for baking sheet cakes and similar treats. Line the bottom and sides of the pan with parchment paper, ensuring that the paper hangs over the edges slightly. This will not only prevent the batter from sticking but also make it easier to remove the gingerbread once it’s baked.
After lining the pan with parchment paper, lightly grease the surface of the parchment with a small amount of butter or cooking spray. This step is crucial as it ensures that the gingerbread will come out of the pan smoothly without tearing or sticking to the paper, allowing for a clean presentation when you are ready to serve or decorate your baked creation.
Step 2: Make the Gingerbread Batter
In a large mixing bowl, crack the necessary number of eggs and add in the brown sugar. Using an electric mixer or a whisk, beat the mixture for 3–4 minutes until it becomes pale in color and thickens. This process is important as it incorporates air into the batter, contributing to a light and fluffy texture in the finished gingerbread.
Once the egg and sugar mixture has reached the desired consistency, gradually beat in the molasses. It’s important to ensure that the molasses is fully combined into the mixture, as this ingredient not only adds a rich flavor but also contributes to the moistness of the gingerbread. Continue mixing until the batter is smooth and homogenous, with no visible streaks of molasses remaining.
Step 3: Mix Dry Ingredients
In a separate bowl, take the time to whisk together the dry ingredients: flour, baking powder, ginger, cinnamon, cloves, nutmeg, and salt. It’s essential to ensure that these ingredients are well combined to avoid clumping and to distribute the spices evenly throughout the batter. The combination of these spices is what gives gingerbread its characteristic warm and aromatic flavor, making it a beloved treat during the holiday season and beyond.
Step 4: Combine Batter
Gently fold dry ingredients into the wet mixture using a spatula or a wooden spoon. Start by adding the dry ingredients, such as flour, baking powder, and any other dry components, to the bowl containing the wet ingredients, which typically include eggs, milk, and melted butter. It is essential to incorporate the dry ingredients gradually, allowing them to blend seamlessly into the wet mixture without creating lumps. The folding technique is crucial here; rather than stirring vigorously, which can develop gluten and lead to a dense cake, you should gently lift and turn the mixture over itself. This method helps maintain the lightness and airiness of the batter, which is vital for achieving a fluffy cake texture.
Be mindful not to overmix the batter. Overmixing can lead to a tough cake, as it can cause the formation of gluten, which is not desired in a light and airy cake. Instead, mix just until you no longer see any dry flour streaks. It’s perfectly acceptable for the batter to have a few small lumps; these will usually bake out during the cooking process. Ensuring that the batter remains light and airy will contribute to the overall texture and rise of your cake, resulting in a deliciously fluffy end product.
Step 5: Bake the Cake
Pour the prepared batter evenly into the pre-greased and floured cake pan. It is important to ensure that the batter is distributed evenly to promote uniform baking. You can use a spatula to help guide the batter into the corners of the pan, ensuring that it fills all areas and avoids any air pockets. This step is crucial, as uneven distribution can lead to an uneven rise, resulting in a cake that is higher on one side than the other.
Once the batter is in the pan, smooth the top gently with a spatula or the back of a spoon. This helps create a level surface for the cake, which is particularly important if you plan to layer or frost the cake later. A smooth top will not only look more appealing but will also aid in even baking, allowing the cake to rise uniformly without creating domes or peaks.
Place the cake in the preheated oven and bake for a duration of 12–15 minutes. Keep a close eye on the cake as it bakes, as oven temperatures can vary. You will know the cake is done when it springs back lightly when touched with a fingertip, indicating that it has set properly. Additionally, you can insert a toothpick into the center of the cake; if it comes out clean or with a few moist crumbs attached, the cake is ready to be removed from the oven. It is important to avoid overbaking, as this can lead to a dry and crumbly texture, which is not desirable in a cake.
Step 6: Roll the Cake While Warm
Begin by laying a clean kitchen towel flat on your kitchen counter. It is important to use a towel that is free of any lint or debris to ensure a smooth surface for your cake. Choosing a towel that is absorbent will help in managing any excess moisture that might escape from the cake as it cools.
Generously dust the towel with powdered sugar. This step is crucial as it prevents the cake from sticking to the towel and helps to create a non-stick barrier. Make sure to cover the entire surface of the towel evenly, as this will ensure that every part of the cake rolls off smoothly without tearing or adhering to the fabric.
Once the cake is out of the oven and while it is still hot, immediately turn the cake onto the prepared towel. It is essential to act quickly during this step because rolling the cake while it is warm helps to maintain its elasticity, making it easier to roll without cracking. Position the cake so that the side that was facing up in the pan is now facing down on the towel.
Carefully peel off the parchment paper that lined the cake pan. Take your time with this step to avoid damaging the delicate surface of the cake. If the parchment paper sticks, gently use a spatula to help lift it away from the cake. This will ensure that the cake retains its shape and texture as you prepare to roll it.
Starting from one of the short sides of the cake, begin to roll the cake with the towel inside. As you roll, use a gentle but firm pressure to keep the cake tight and uniform. The towel will help shape the cake into a spiral, which is essential for creating a beautiful presentation once it is filled and frosted. Be careful not to roll too tightly, as this could cause the cake to crack.
Once you have rolled the cake completely, set it aside to let it cool completely, which should take about 30 minutes. During this cooling period, the rolled cake will set into its new shape, allowing you to fill and frost it later without any issues. It is important to let it cool in this rolled position to ensure that the cake maintains its integrity and does not lose its form when you unroll it later for filling.
Step 7: Prepare Cream Cheese Filling
Begin by taking your cream cheese out of the refrigerator and allowing it to soften at room temperature for about 30 minutes. This step is crucial as it ensures that the cream cheese will beat smoothly without lumps. Once softened, place the cream cheese in a mixing bowl and use an electric mixer or a whisk to beat it until it reaches a silky, smooth consistency. This process should take about 2-3 minutes at medium speed, ensuring that there are no visible lumps remaining.
Next, gradually add the powdered sugar to the smooth cream cheese. It is best to sift the powdered sugar beforehand to avoid any clumps in the filling. Along with the powdered sugar, add a splash of vanilla extract, which will enhance the flavor profile of the filling. Continue to beat the mixture on medium speed until it becomes creamy and well combined, which should take an additional 2-3 minutes. The mixture should be thick yet spreadable, with a rich, sweet flavor that balances perfectly with the tanginess of the cream cheese.
In a separate mixing bowl, pour in the heavy cream. Using a clean whisk or an electric mixer, whip the cream until it forms stiff peaks. This means that when you lift the whisk out of the cream, the peaks should stand upright without collapsing. This step is essential because the whipped cream will add lightness and volume to the filling, creating a delightful texture. Be cautious not to over-whip the cream, as it can turn grainy and begin to separate.
Once the whipped cream has reached the desired consistency, gently fold it into the cream cheese mixture. Use a spatula to incorporate the whipped cream, being careful not to deflate the airy texture you just created. Folding should be done in a gentle motion, bringing the cream from the bottom of the bowl to the top, until the mixture is uniformly blended and no streaks remain. The final cream cheese filling should be light, fluffy, and ready to be used in the next steps of your cake assembly.
Step 8: Fill the Cake
After your cake has cooled completely, it’s time to carefully unroll it. Place the cake on a clean, flat surface, and gently peel back the towel or parchment paper that it was rolled in. Take your time during this step to avoid cracking the cake. If the cake feels too firm, let it sit for a few more minutes to soften slightly. Once unrolled, you should have a beautiful, flat surface ready for the filling.
Using a spatula, take the cream cheese filling you prepared earlier and spread it evenly across the surface of the cake. Be sure to leave a ½-inch border around the edges; this will allow the filling to remain contained when you re-roll the cake. Spread the filling with a gentle hand, ensuring that it reaches all corners and is evenly distributed, so every bite of the cake will have a delicious taste of the cream cheese filling.
Now, it’s time to gently re-roll the cake. Starting from one end, carefully lift the edge of the cake and begin to roll it back towards the opposite end. As you roll, be mindful to keep the filling intact and avoid squeezing too tightly, which could cause the cake to crack. Once you reach the end, the cake should be tightly rolled into a spiral. If you find that the cake is sticking, you can use a spatula to help guide it along. After rolling, place the cake seam side down on a serving platter or a cake board, ensuring that it maintains its shape and the filling is secure inside.
Step 9: Chill
To begin the chilling process, carefully wrap the entire cake in plastic wrap. This step is crucial as it helps to lock in moisture, ensuring that the cake remains moist and delicious after chilling. Make sure the wrap is snug against the surface of the cake to prevent any air from getting in, which could lead to drying out or the absorption of unwanted odors from the refrigerator.
Once the cake is securely wrapped, place it in the refrigerator. It is important to refrigerate the cake for at least 1 hour to allow it to set properly. Chilling the cake not only helps firm up the frosting and any layers but also enhances the flavors, allowing them to meld together beautifully. If time permits, consider chilling the cake for a longer period, as this can further improve its texture and taste. Remember to check the cake periodically to ensure it is setting well and to maintain an optimal temperature in your refrigerator.
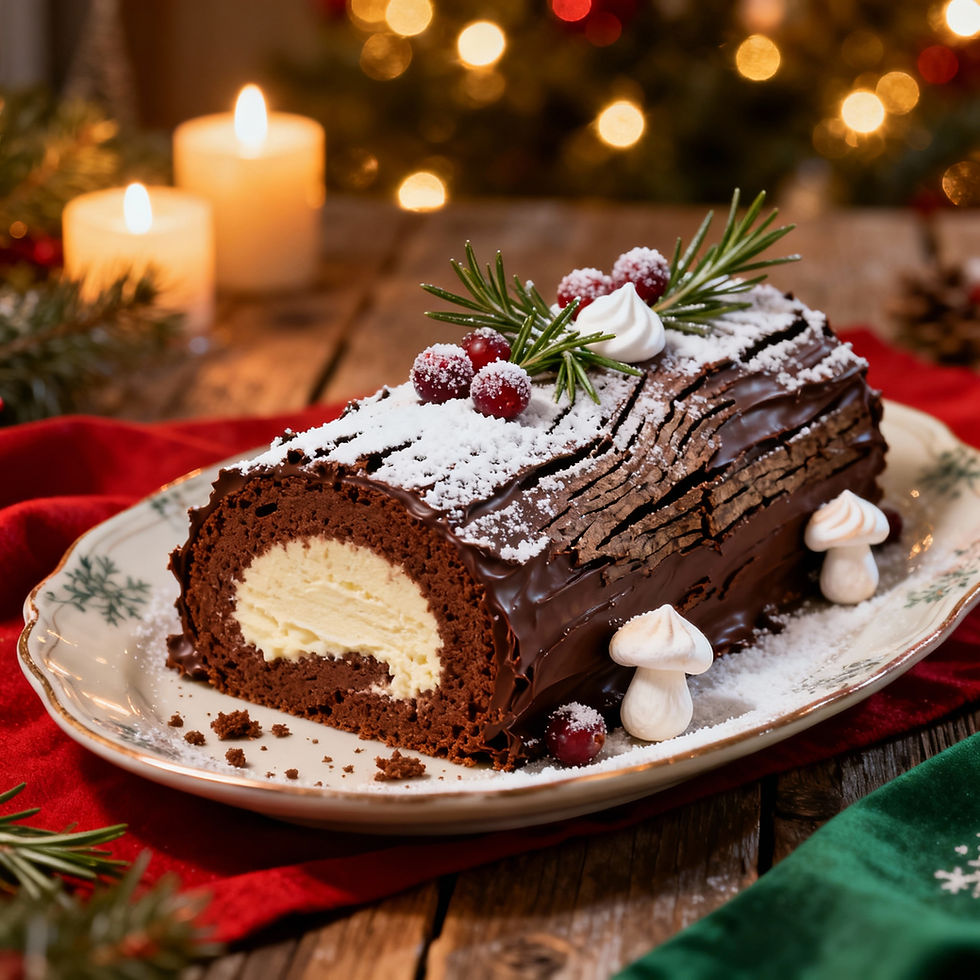
Step 10: Decorate & Serve
As the chilling time comes to an end, prepare to add the finishing touches to your cake. Begin by dusting the top of the chilled cake with a light layer of powdered sugar. This not only adds a touch of sweetness but also creates a beautiful visual contrast against the frosting, enhancing the overall presentation. Use a fine sieve or sifter to sprinkle the powdered sugar evenly across the surface, ensuring that it looks delicate and inviting.
Next, consider garnishing the cake to elevate its appearance and flavor profile. Fresh rosemary sprigs can be used for a touch of elegance and a hint of herbal flavor that complements many cakes beautifully. Alternatively, sugared cranberries can add a festive touch, providing a burst of color and a sweet-tart flavor that pairs wonderfully with the rich cake. To prepare sugared cranberries, simply coat them in sugar after briefly soaking them in a simple syrup. Arrange your chosen garnishes artfully on top of the cake, allowing them to cascade down the sides for a stunning effect.
Finally, it’s time to slice and serve your beautifully decorated cake. Use a sharp knife to cut even slices, ensuring that each piece showcases the layers and decorations. Serve the cake on a decorative platter, and consider pairing it with a dollop of whipped cream or a scoop of ice cream for an extra indulgent experience. Enjoy the delightful flavors and textures of your creation with family and friends, celebrating the culmination of your hard work and creativity in the kitchen.
🎄 FESTIVE VARIATIONS
🍊 Orange Cream Filling
Add 1 tsp orange zest to the filling
🍫 Chocolate Gingerbread Roll
Add cocoa powder to the sponge
🍯 Maple Cream Filling
Replace vanilla with maple extract
4 . Christmas Brownie Trees (Festive Holiday Dessert)
Serves-12–16 brownie trees
Prep Time-25 minutes
Bake Time-20–25 minutes
Cooling & Decorating Time-40 minutes

Ingredients
Brownie Base
½ cup (115 g) unsalted butter
1 cup granulated sugar
2 large eggs
1 tsp vanilla extract
⅓ cup cocoa powder
½ cup all-purpose flour
¼ tsp salt
¼ tsp baking powder
Green Frosting
1 cup unsalted butter, softened
2½ cups powdered sugar
1 tsp vanilla extract
1–2 tbsp milk
Green food coloring
Decorations
Mini candy stars
Sprinkles
M&M’s or candy pearls
Pretzel sticks or lollipop sticks
Step-by-Step Instructions
Step 1: Prepare the Baking Pan
Preheat oven to 350°F (175°C). This temperature is crucial for ensuring that your brownies bake evenly and achieve that perfect fudgy texture. Make sure to give your oven enough time to reach the desired temperature before placing the brownies inside, as this helps in achieving consistent results.
Line an 8×8-inch (20×20 cm) baking pan with parchment paper. To do this effectively, cut a piece of parchment paper that is slightly larger than the bottom of the pan, allowing the edges to hang over the sides. This will make it easier to lift the brownies out of the pan once they are baked. The parchment paper not only prevents sticking but also aids in cleanup.
Lightly grease the parchment. Use a small amount of butter or non-stick cooking spray to grease the parchment paper. This step is important as it provides an additional layer of non-stick protection, ensuring that your brownies release easily from the pan after baking. Make sure to cover all areas of the parchment paper that will come into contact with the brownie batter.
Step 2: Make the Brownie Batter
Melt butter and let cool slightly. You can melt the butter in a microwave-safe bowl or on the stovetop. If using the microwave, heat it in short bursts to avoid overheating. Allowing the butter to cool slightly is essential to prevent cooking the eggs when they are added later, which could result in a grainy texture.
Whisk in sugar until glossy. Use a whisk or a wooden spoon to combine the melted butter and sugar thoroughly. This step is important as it incorporates air into the mixture, contributing to a lighter texture. The mixture should become glossy and well-blended, indicating that the sugar is beginning to dissolve into the butter.
Add eggs one at a time, whisking well. Crack each egg into a separate bowl to ensure no shell fragments get into the batter. Add each egg individually to the mixture, whisking vigorously after each addition. This process helps to create a smooth batter and ensures that the eggs are fully incorporated, leading to a richer flavor and texture.
Stir in vanilla. Adding pure vanilla extract enhances the flavor profile of your brownies, providing a warm and inviting aroma. Gently fold the vanilla into the batter until it is evenly distributed, being careful not to overmix at this stage.
Step 3: Add Dry Ingredients
Sift cocoa powder, flour, salt, and baking powder. Sifting these dry ingredients together is crucial as it helps to remove any lumps, ensuring a smooth batter. It also aerates the dry ingredients, which can contribute to a lighter texture in the finished brownies. Use a fine-mesh sieve or a sifter for this step, and make sure to measure the ingredients accurately for the best results.
Fold gently into the wet mixture until just combined. Using a spatula or wooden spoon, carefully fold the dry ingredients into the wet mixture. Be cautious not to overmix, as this can lead to dense brownies. The goal is to combine the ingredients until no dry streaks remain, but some lumps are okay. This gentle folding technique helps maintain the airiness developed in the previous steps, contributing to the brownies' desired fudgy texture.
Step 4: Bake the Brownies
Begin by carefully pouring the prepared brownie batter into the greased or lined baking pan. Make sure to scrape the sides of the mixing bowl to ensure that all the delicious batter is transferred, as this will contribute to the overall flavor and texture of the brownies.
Once the batter is in the pan, use a spatula to smooth the top evenly. This step is crucial because an even surface will help the brownies bake uniformly, preventing any parts from overcooking or remaining undercooked. Take your time to ensure the batter is evenly distributed across the pan, reaching the corners and edges.
Now, place the pan in a preheated oven and bake for 20–25 minutes. Keep a close eye on the brownies as they bake, as oven temperatures can vary. To check for doneness, insert a toothpick into the center of the brownies; it should come out with a few moist crumbs clinging to it, indicating that the brownies are perfectly baked and not overdone. If the toothpick comes out clean, the brownies may be overbaked, so it’s essential to monitor them closely as they approach the end of the baking time.
Once baked to perfection, remove the pan from the oven and allow the brownies to cool completely in the pan. This cooling process is important, as it allows the brownies to set and makes them easier to cut later. You can let them cool at room temperature or, if you’re in a hurry, place the pan in the refrigerator for a quicker cooling method. However, be cautious not to chill them too long, as this can affect their texture.
Step 5: Cut Brownie Trees
After the brownies have cooled completely and are firm to the touch, it’s time to remove them from the pan. If you used parchment paper, simply lift the brownies out by the edges of the paper. If not, carefully run a knife around the edges of the pan to loosen the brownies before inverting the pan onto a clean surface. Gently tap the bottom of the pan to help release the brownies without breaking them.
Once the brownies are out of the pan, place them on a cutting board. Using a sharp knife, cut the brownies into squares, ensuring each piece is of equal size for a uniform appearance. This step is not only for aesthetics but also ensures that each square has the same delicious flavor and texture, making for a delightful treat.
After you have cut the brownies into squares, take each square and slice it diagonally to form triangle shapes. This technique will give your brownies a festive tree shape, perfect for your intended design. Make sure to wipe the knife between cuts to maintain clean edges and a polished look.
To add a fun and decorative touch, insert a pretzel stick or a small candy stick into the bottom of each brownie triangle. This not only enhances the visual appeal of your brownie trees but also provides a convenient way to hold and enjoy these delightful treats. You can even embellish the tops with icing, sprinkles, or edible glitter to make them look even more festive and inviting.
Step 6: Prepare Green Frosting
Begin by taking your unsalted butter out of the refrigerator and allowing it to soften at room temperature for about 30 minutes. Once it is soft, place the butter in a large mixing bowl. Using an electric mixer, beat the butter on medium speed until it becomes fluffy and light in texture. This process usually takes about 3 to 5 minutes and is crucial for achieving a creamy consistency that will serve as the base for your frosting.
Once the butter has reached the desired fluffiness, it’s time to gradually incorporate the powdered sugar. Start by adding one cup of powdered sugar to the bowl, mixing on low speed to prevent a sugary cloud from forming. After the sugar is incorporated, you can increase the speed to medium. Continue adding the powdered sugar in increments of one cup, mixing thoroughly after each addition. This gradual method ensures that the frosting remains smooth and free of lumps.
After all the powdered sugar has been added, it’s time to enhance the flavor of your frosting. Pour in a teaspoon of pure vanilla extract, which will add a delightful aroma and taste to your frosting. Next, add a tablespoon of milk to the mixture. The milk will help achieve the right consistency, making the frosting easier to spread. If you find the frosting too thick, you can add an additional teaspoon of milk until you reach the desired smoothness.
Beat the mixture on high speed for another 2 to 3 minutes until the frosting is completely smooth and spreadable. Scrape down the sides of the bowl with a spatula to ensure all ingredients are well combined. The final texture should be creamy and easy to work with, perfect for decorating your baked goods.
Now, to create the vibrant green color for your frosting, add green food coloring. Start with a few drops and mix well, observing the shade as you go. Depending on the intensity of the color you desire, you may need to add more food coloring. Continue mixing until the frosting reaches a beautiful, rich green hue, reminiscent of lush pine trees. Once tinted, set the frosting aside until you are ready to use it for decorating.
Step 7: Decorate the Trees
With your green frosting prepared and ready, it’s time to turn your brownies into delightful tree shapes. Using a piping bag fitted with a star tip or a round tip, begin to pipe the frosting onto the brownies in a zig-zag pattern, mimicking the branches of a tree. Alternatively, you can create swirls that resemble the natural shape of tree foliage. Start from the base and work your way up to create a visually appealing and textured effect. Make sure to cover the entire surface of the brownie to give it a festive look.
Once you have piped the frosting onto the brownies, it’s time to add some fun and festive decorations. Sprinkle colorful sprinkles over the frosting to add texture and a pop of color. You can also use small candies, such as M&M's or chocolate chips, to decorate the trees further. For an extra touch of whimsy, consider adding edible star-shaped candies or sugar stars at the top of each tree to represent the star that often adorns the peak of a Christmas tree. The combination of these decorations will create a visually appealing and festive treat.
After adding all your decorations, gently press down on the sprinkles and candies to secure them in place. This step is important as it helps the decorations adhere to the frosting, ensuring they don’t fall off when the brownies are served. Take care not to press too hard, as you want to maintain the shape of the frosting and the overall aesthetic of your decorated trees. Once finished, your beautifully decorated brownie trees will be ready to impress at any gathering or celebration.
Step 8: Set & Serve
Chill brownies 20 minutes to set frosting. This crucial step allows the frosting to firm up, ensuring that it adheres well to the brownies and enhances their overall texture. During this time, the cool environment helps the frosting develop a slightly crusty top while remaining creamy underneath, creating a delightful contrast when you take a bite. To achieve the best results, place the brownies in the refrigerator on a flat surface, making sure they are covered lightly with wax paper or plastic wrap to prevent any unwanted absorption of odors from the fridge.
Arrange on a festive platter. Presentation is key when serving brownies, especially if they are part of a special occasion or gathering. Choose a platter that complements the colors of the brownies and frosting. Consider using a decorative platter with vibrant patterns or one that is simple and elegant, allowing the brownies to be the star of the show. You can enhance the visual appeal by garnishing the platter with fresh fruits, such as strawberries or raspberries, or by scattering a few mint leaves around the brownies. This not only adds a pop of color but also introduces a fresh aroma that can elevate the dessert experience.
Serve and enjoy! Once the brownies are beautifully arranged, it’s time to share them with friends, family, or guests. Consider providing a few serving utensils, such as a spatula or tongs, to make it easy for everyone to help themselves. Encourage your guests to savor each bite, as the combination of rich chocolate brownie and creamy frosting is sure to please any dessert lover. To enhance the experience further, you might offer a variety of accompaniments, such as a scoop of vanilla ice cream, a drizzle of caramel sauce, or a dusting of powdered sugar on top. This allows each person to customize their serving to their own taste preferences, making the dessert even more enjoyable.
🎄 FUN CHRISTMAS VARIATIONS
🌱 Vegan Brownie Trees
Use dairy-free butter and egg substitute
🌾 Gluten-Free Brownie Trees
Replace flour with gluten-free blend
🍫 Chocolate Buttercream Trees
Use chocolate frosting instead of green
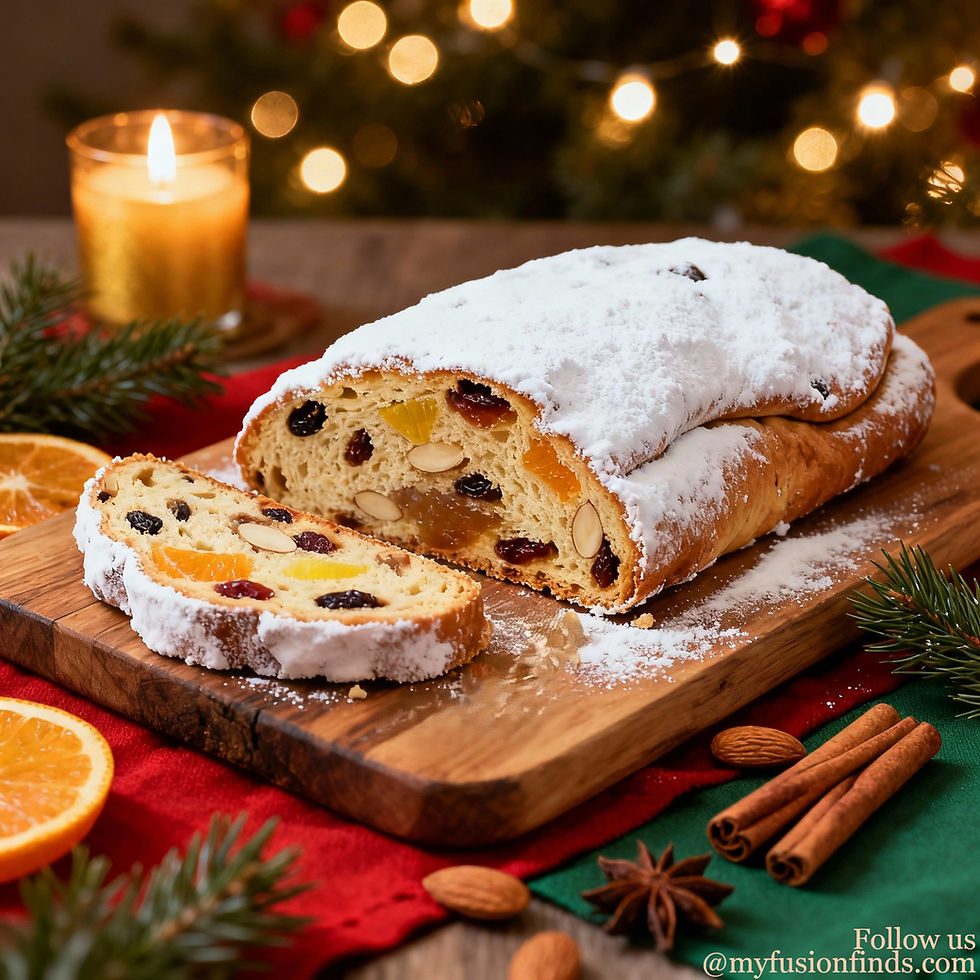
5 . Traditional German Stollen (Christmas Fruit Bread)
Serves 1 large loaf (10–12 slices)
Prep Time-30 minutes
Rise Time-2½–3 hours (total)
Bake Time-40–45 minutes
Ingredients
Fruit Soak
¾ cup raisins
¼ cup candied orange peel
¼ cup candied lemon peel
¼ cup rum or orange juice
Dough
3½ cups all-purpose flour
¼ cup granulated sugar
2¼ tsp (1 packet) active dry yeast
¾ cup warm milk (110°F / 43°C)
½ cup unsalted butter, softened
1 large egg
1 tsp salt
1 tsp vanilla extract
1 tsp ground cinnamon
¼ tsp nutmeg
Zest of 1 lemon
Filling
½ cup blanched almonds, chopped
7 oz (200 g) marzipan (optional but traditional)
Topping
¼ cup melted butter
1 cup powdered sugar
Step-by-Step Instructions
Step 1: Soak the Fruit
Begin by gathering your ingredients, which should include a generous amount of raisins, some candied peels, and either rum or juice, depending on your preference for flavor and alcohol content. The choice of rum adds a rich depth to the fruit, while juice can provide a lighter, more refreshing taste.
In a medium-sized mixing bowl, combine the raisins and candied peels with the rum or juice. Make sure the fruit is evenly coated with the liquid to ensure optimal soaking. This step is crucial as it allows the fruit to absorb moisture and flavor, enhancing the overall taste of your final product.
Once combined, cover the bowl tightly with plastic wrap or a lid to prevent any evaporation. Allow the mixture to soak for at least 2 hours or overnight for the best results. Soaking overnight is particularly beneficial as it gives the fruit ample time to plump up and become more flavorful. Before you proceed to the next step, be sure to drain any excess liquid from the soaked fruit to avoid making your dough too wet.
Step 2: Activate the Yeast
To start, take a small saucepan and gently warm the milk until it reaches a lukewarm temperature. It is essential that the milk is not hot, as high temperatures can kill the yeast, preventing it from activating properly. The ideal temperature should feel warm to the touch but not scalding.
Once the milk is warm, add in 1 tablespoon of sugar, which will serve as food for the yeast, helping it to bloom. Then, sprinkle the yeast over the warm milk and sugar mixture. Allow this mixture to sit undisturbed for a few minutes. During this time, the yeast will begin to activate, feeding on the sugar and producing carbon dioxide, which will create a foamy layer on top.
After letting it stand for 5–10 minutes, you should see a frothy layer forming on the surface of the liquid. This foamy appearance indicates that the yeast is alive and ready to be incorporated into your dough. If no foam appears, it may be necessary to start over with fresh yeast, as it may have been inactive.
Step 3: Make the Dough
In a large mixing bowl, combine the dry ingredients. This should include flour, the remaining sugar, salt, cinnamon, nutmeg, and freshly grated lemon zest. The spices and zest not only add flavor but also contribute to the aroma of the dough, making it delightful and inviting.
Once the dry ingredients are well mixed, create a well in the center and add the activated yeast mixture, an egg, a splash of vanilla extract for added depth of flavor, and softened butter. The butter should be at room temperature to ensure it blends easily into the mixture. Using a wooden spoon or a spatula, mix the ingredients together until a soft dough begins to form.
The goal is to achieve a dough that is cohesive and slightly sticky, but not overly wet. Continue mixing until all the ingredients are well incorporated and a soft dough is visible. At this stage, you may need to adjust the consistency by adding a little more flour if the dough is too sticky or a splash of milk if it feels too dry.
Step 4: Knead the Dough
Transfer the dough to a lightly floured surface or keep it in the bowl if using a stand mixer. Knead the dough by hand or with the mixer’s dough hook for 8–10 minutes. This process is essential as it develops the gluten in the flour, giving the dough its structure and elasticity. As you knead, the dough should become smoother and more elastic to the touch.
As you knead, keep an eye on the texture of the dough. It should be slightly sticky but still manageable. If it sticks too much to your hands or the surface, you can sprinkle a little extra flour as needed. The end result should be a dough that is soft, pliable, and ready for the next steps in your baking process.
Step 5: First Rise
Begin by placing the prepared dough into a greased bowl, ensuring that the bowl is adequately coated with oil or butter to prevent the dough from sticking as it rises. This is a crucial step, as it creates an optimal environment for the yeast to thrive and promotes a successful rise.
Once the dough is in the bowl, cover it securely with a clean kitchen towel or plastic wrap to retain warmth and moisture. This covering is essential to create a warm microclimate that encourages fermentation. Allow the dough to rise in a warm place, such as an oven with the light on or a cozy corner of your kitchen, for approximately 1½ hours. During this time, the dough should expand significantly, ideally doubling in size, which indicates that the yeast is active and the fermentation process is working effectively.
Step 6: Add Fruit & Nuts
After the first rise is complete, it’s time to enhance the dough by incorporating the soaked fruit and almonds. Begin by gently kneading the soaked dried fruits, such as raisins, currants, or candied citrus peel, along with the chopped almonds into the dough. It’s important to handle the dough delicately at this stage, as you want to preserve the air pockets that have formed during the first rise.
Continue kneading the dough just until the fruit and nuts are evenly distributed throughout the mixture. This step should be done with care to avoid overworking the dough, which can lead to a denser final product. Aim for a uniform texture where each bite contains a delightful mix of flavors from the fruit and the crunch of the almonds.
Step 7: Shape the Stollen
To shape the stollen, start by rolling the dough into an oval shape that is approximately 1 inch thick. This thickness is ideal for ensuring that the bread bakes evenly and retains a soft, tender crumb. The oval shape is traditional for stollen and helps in achieving the characteristic look of this festive bread.
Next, take the marzipan log, which has been prepared separately, and place it slightly off-center on the rolled-out dough. The marzipan adds a rich, sweet flavor and a delightful texture that complements the fruit and nuts.
Carefully fold the dough over the marzipan lengthwise, ensuring that the marzipan is encased within the dough. This folding technique not only helps to keep the marzipan hidden until the bread is sliced but also creates layers that enhance the overall texture of the stollen.
Once the dough is folded over the marzipan, gently seal the edges to prevent any filling from escaping during baking. This can be done by pinching the dough together or pressing it lightly with your fingers. Taking care with this step will ensure that the stollen maintains its shape and integrity throughout the baking process.
Step 8: Second Rise
After shaping the stollen, transfer the loaf onto a lined baking tray. Using parchment paper or a silicone baking mat can help with easy removal after baking and prevent sticking. Position the loaf in a way that allows sufficient space around it for expansion as it rises.
Cover the shaped loaf loosely with a kitchen towel or plastic wrap, allowing it to rise again for about 30–45 minutes. This second rise is essential for achieving a light and airy texture in the finished bread. During this time, the dough will puff up, preparing it for the final bake. Keep an eye on it to ensure it’s rising properly; it should become noticeably larger and softer.
Step 9: Bake
Begin by preheating your oven to 350°F (175°C). This initial step is crucial as it ensures that the oven reaches the optimal temperature for baking, allowing for even cooking and proper rising of the stollen. Make sure to give your oven enough time to preheat fully, as placing your stollen in a cold oven can lead to uneven baking results.
Once the oven is preheated, carefully place the stollen inside and bake for a duration of 40–45 minutes. During this time, keep an eye on the stollen as it bakes, watching for the beautiful transformation to a golden brown color. The baking time may vary slightly depending on your oven and the size of your stollen, so it’s wise to check for doneness by inserting a toothpick into the center; if it comes out clean, your stollen is ready. The aroma that fills your kitchen as it bakes will be a delightful indication that something wonderful is happening!
If you notice that the top of the stollen is browning too quickly, do not hesitate to cover it loosely with foil. This will help to prevent the surface from burning while allowing the inside to continue cooking thoroughly. It’s a simple yet effective technique to ensure that you achieve that perfect, golden exterior without compromising the moist and flavorful interior.
Step 10: Butter & Sugar Finish
As soon as the stollen comes out of the oven, it’s time to enhance its flavor and appearance with a generous brush of melted butter. Use a pastry brush to apply the melted butter evenly over the hot stollen, allowing it to soak in and create a rich, indulgent layer that adds moisture and a delightful sheen to the surface.
Next, take a generous amount of powdered sugar and dust it thickly over the buttered stollen. The powdered sugar not only adds sweetness but also creates a beautiful, snowy appearance that is characteristic of this festive bread. Make sure to cover all sides, as this finishing touch is both visually appealing and enhances the overall flavor profile.
After the stollen has cooled down, consider repeating the butter-and-sugar process for an extra layer of flavor and sweetness. This second application will create a delightful contrast between the rich, buttery exterior and the tender, flavorful interior, making every bite a treat. Allowing the stollen to cool slightly before this step ensures that the butter adheres better and the sugar doesn’t melt away completely.
Step 11: Mature Before Serving
To allow the flavors of your stollen to develop fully, wrap it tightly in foil. This step is important as it helps to retain moisture and keep the stollen fresh. Wrapping it securely ensures that the bread does not dry out and that the flavors meld together beautifully over time.
Store the wrapped stollen in a cool place for a period of 1–2 weeks for the best flavor experience. During this maturation period, the spices and ingredients will continue to infuse, resulting in a more complex and delicious taste. It’s worth the wait, as the stollen will become even more enjoyable as the days go by, making it a perfect treat for holiday gatherings or as a delightful gift for friends and family.
🎄 FESTIVE VARIATIONS
🌰 Nut Stollen
Add hazelnuts or walnuts
🍊 Orange Cranberry Stollen
Replace raisins with dried cranberries
🌱 Vegan Stollen
Use plant milk, vegan butter, and no egg


Comments